
Transferring Files Using Globus
Globus provides a relatively simple and reliable way to access and move research data between systems with faster transfer speeds than traditional tools such as sftp and rsync.
Globus requires some setup ahead of time, but it is robust and appropriate when your data transfer will take a long time or your connection may be periodically interrupted. It also allows you to share your data with colleagues, move data back and forth between CARC storage systems and personal workstations, and restart or resume a failed or paused file transfer — even a very large one.
Note: Due to security risks, please be mindful of the type of information being transferred. Where possible, omit all information that may be considered confidential. For examples of confidential information that requires additional consideration, visit http://itservices.usc.edu/security/sensitive-info.
Getting started with Globus
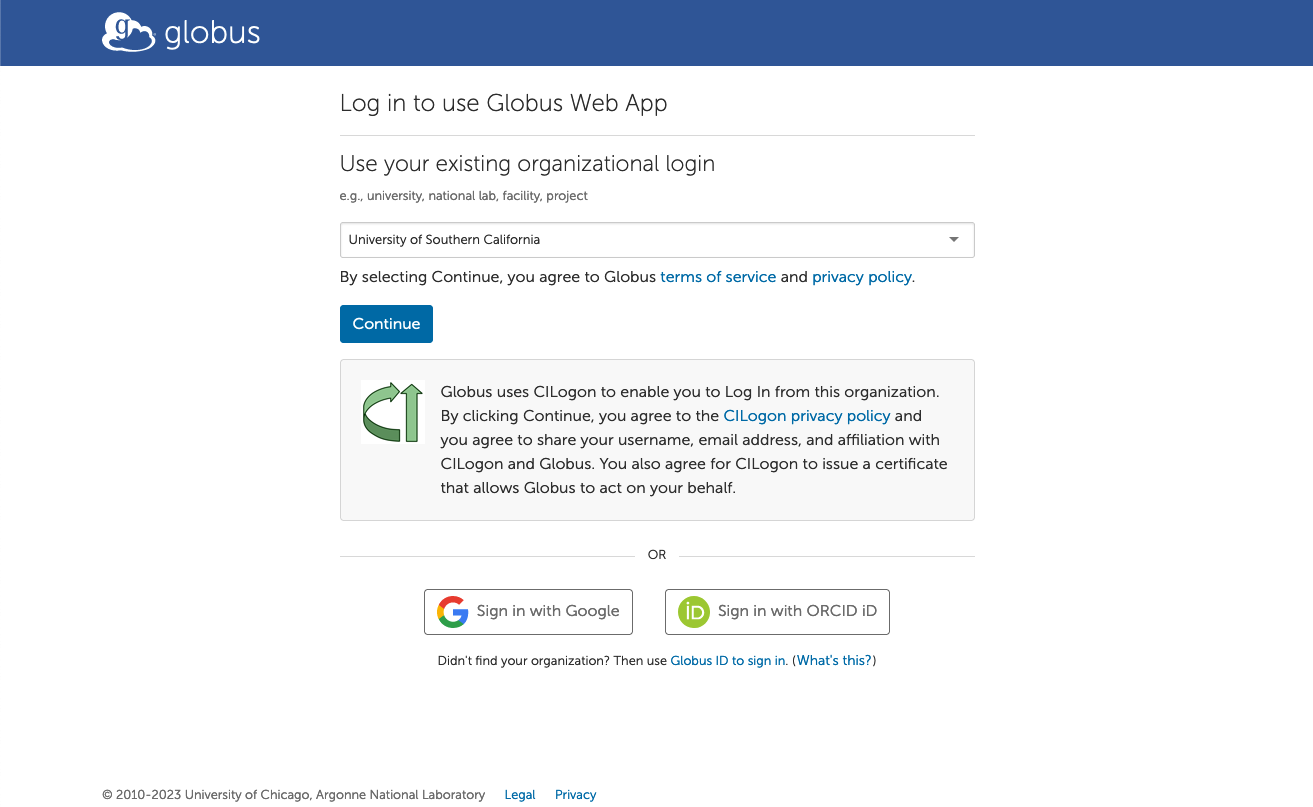
To start using Globus, go to https://www.globus.org in your browser and click Log In. Type University of Southern California in the box that says "Use your existing organizational login" and click Continue:
If you have not already authenticated in the same browser, you will then be taken to the USC Shibboleth page to enter your USC NetID and password:

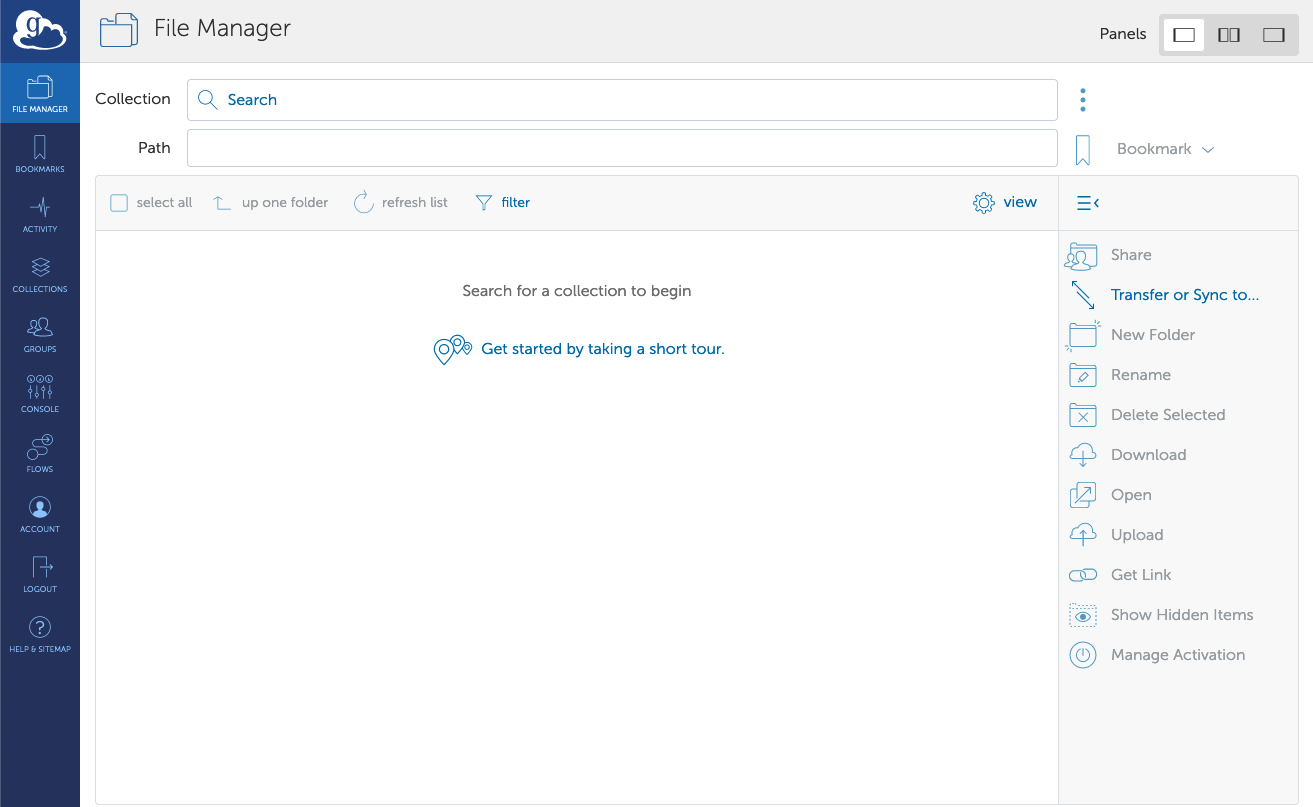
After authenticating, you will be taken to the Globus File Manager page:
Setting up Collections for file transfers
In Globus terminology, a user sets up a Collection, which is simply a place to transfer files. This can be a folder on your local computer, your directories on CARC systems, or even a remote location you have access to through a scientific computing affiliation.
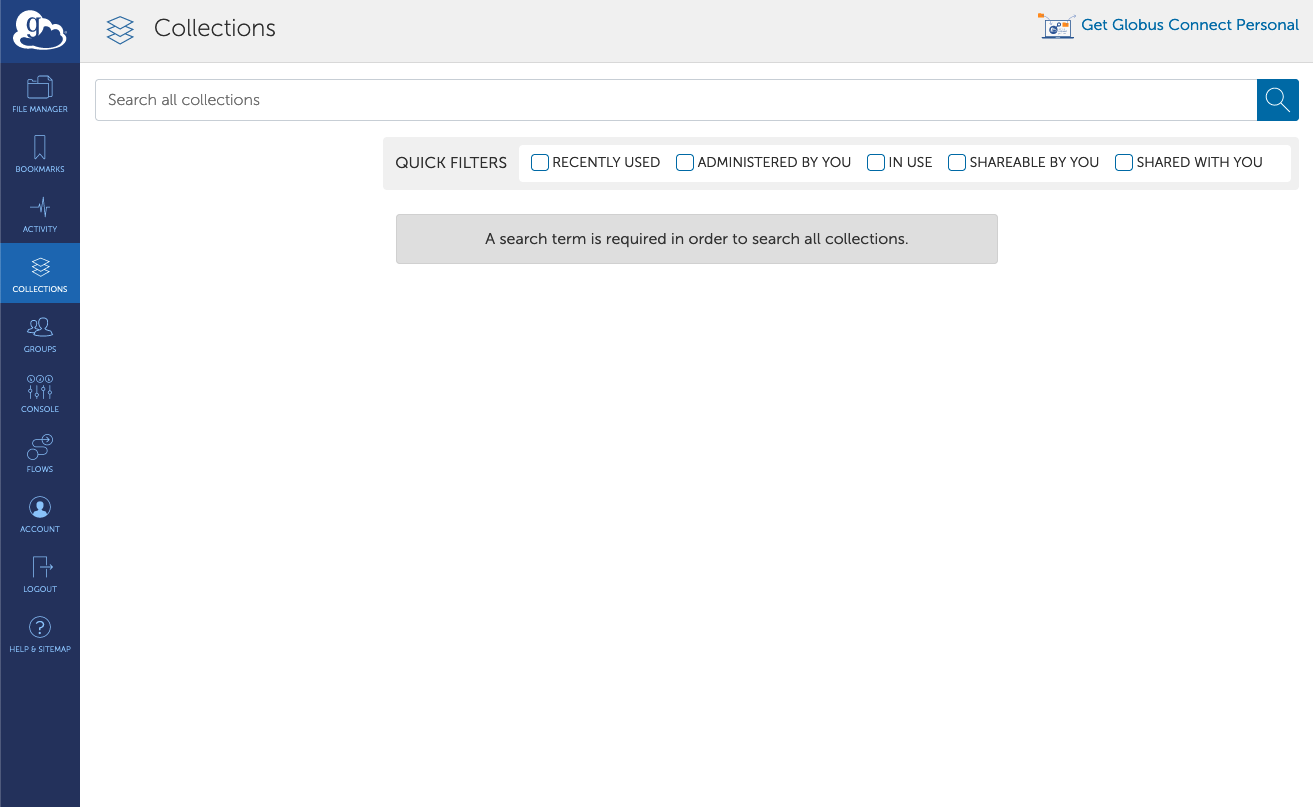
In the Globus user interface, click Collections in the left menu panel to be taken to the Collections page. In the upper right corner, click on Get Globus Connect Personal:
Installing Globus Connect Personal
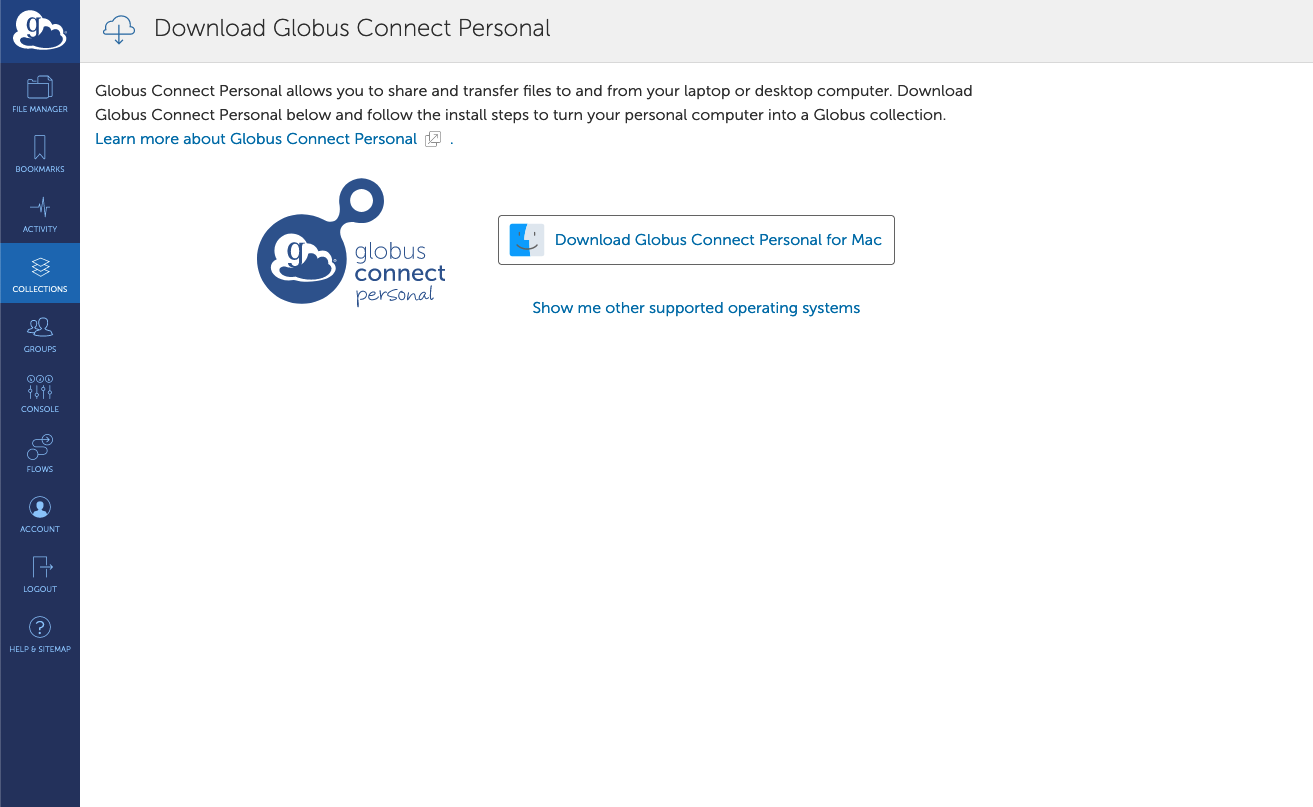
Next, you will be presented with a link to download and install the desktop service, Globus Connect Personal, on your local computer:
Follow the installation instructions for your operating system:
After installing, start the Globus Connect Personal application. A new window will pop up asking you to log in:
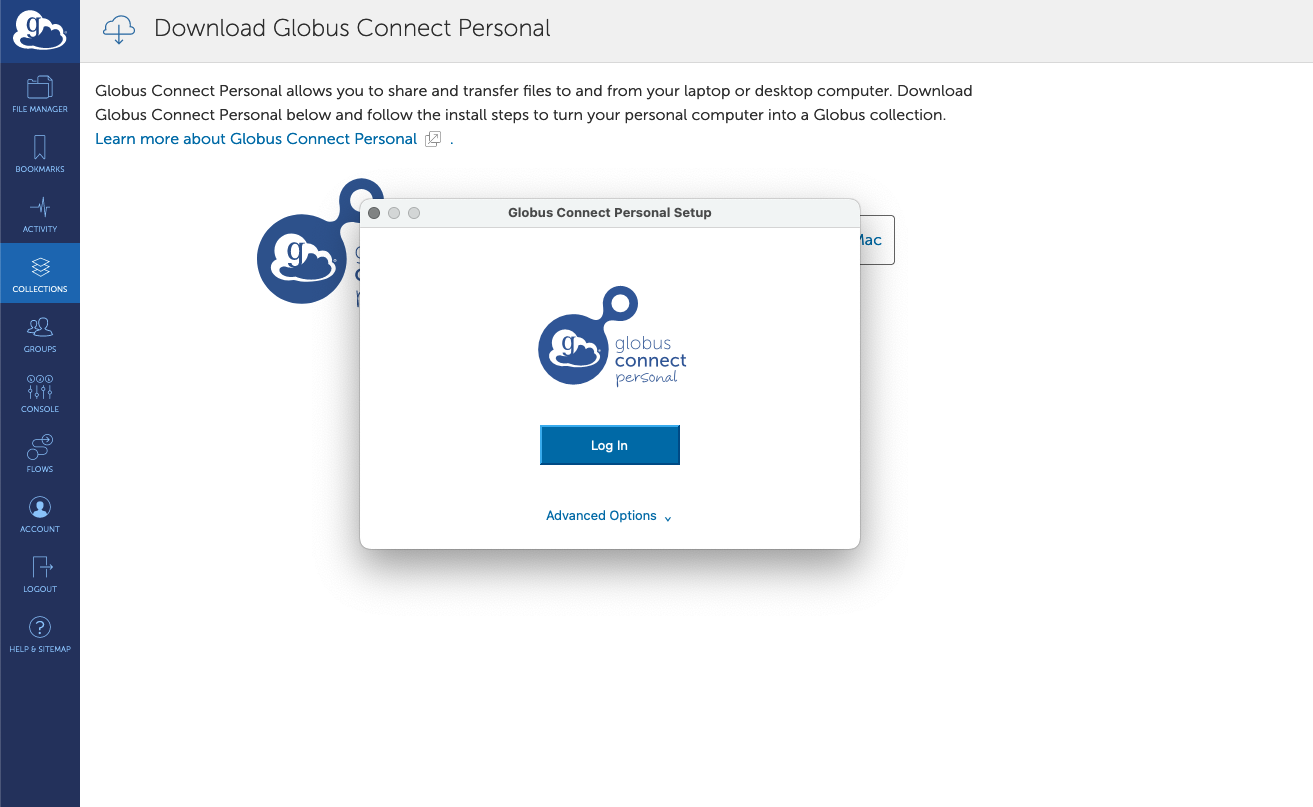
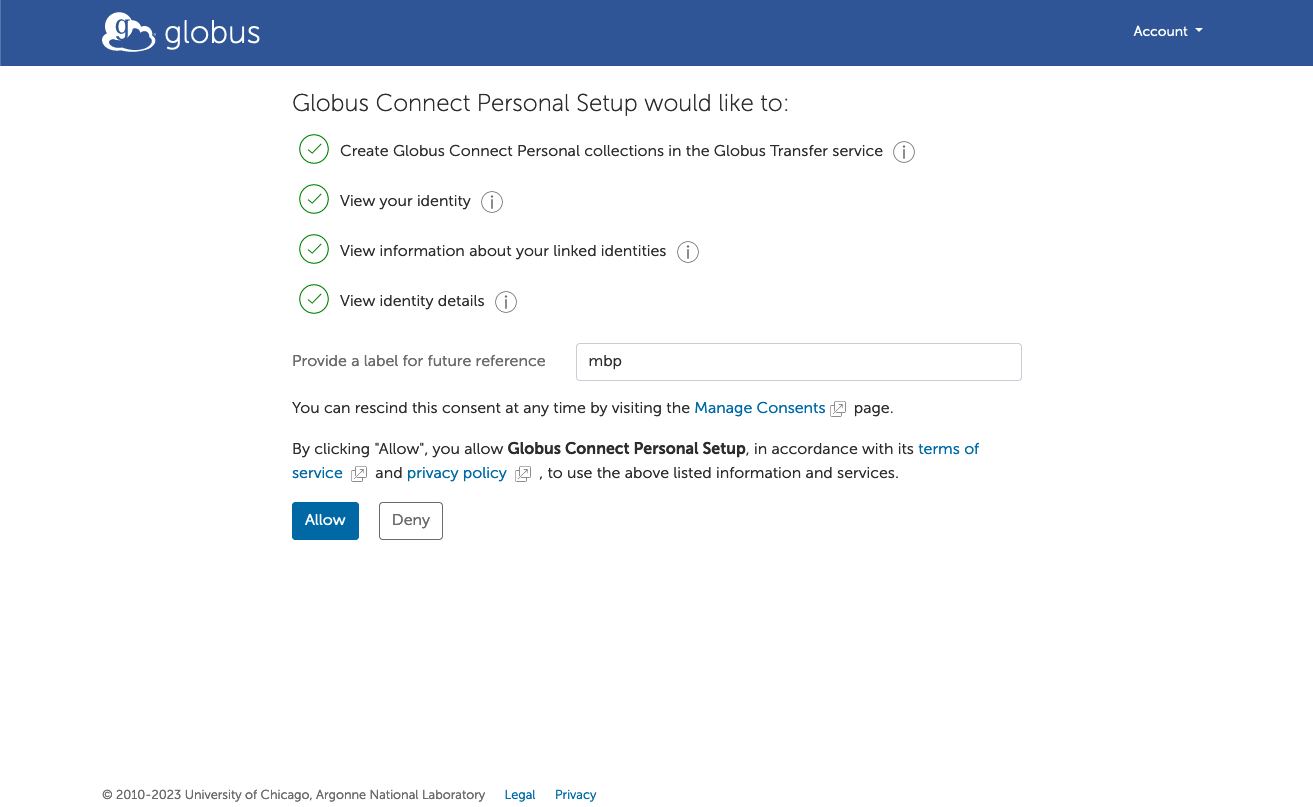
Once logged in, allow the setup to continue by granting consent to the Globus service and providing a label for your computer:
Establishing a local collection
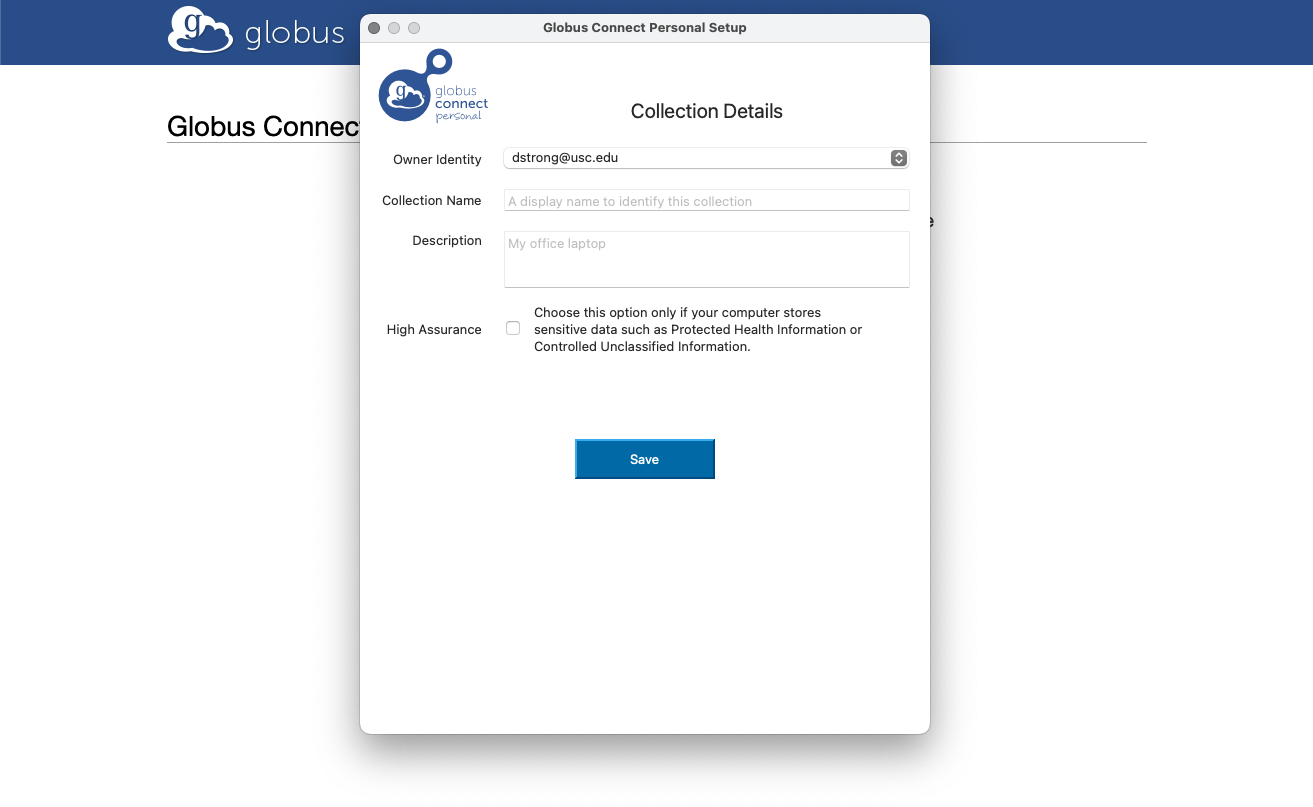
A window will pop up asking for Collection Details, for establishing a local collection on your local computer. Under Collection Name, use a descriptive name. Do not choose the High Assurance option — that feature is beyond the scope of this document. After filling out the form, click Save:
Depending on whether Globus knows your account ID from a previous login or existing affiliation, you may be asked to generate a Setup Key for your collection. Save this key in case you are asked for it during the next one or two steps.
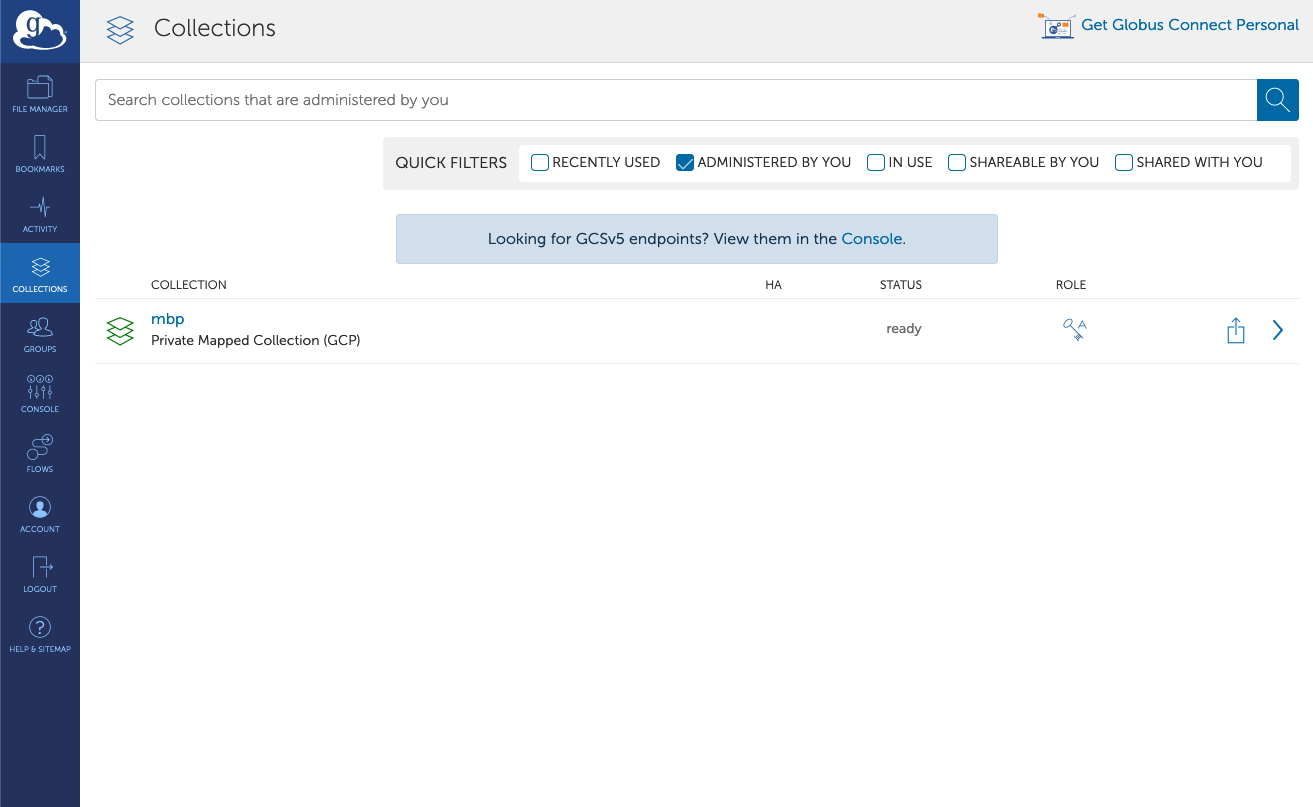
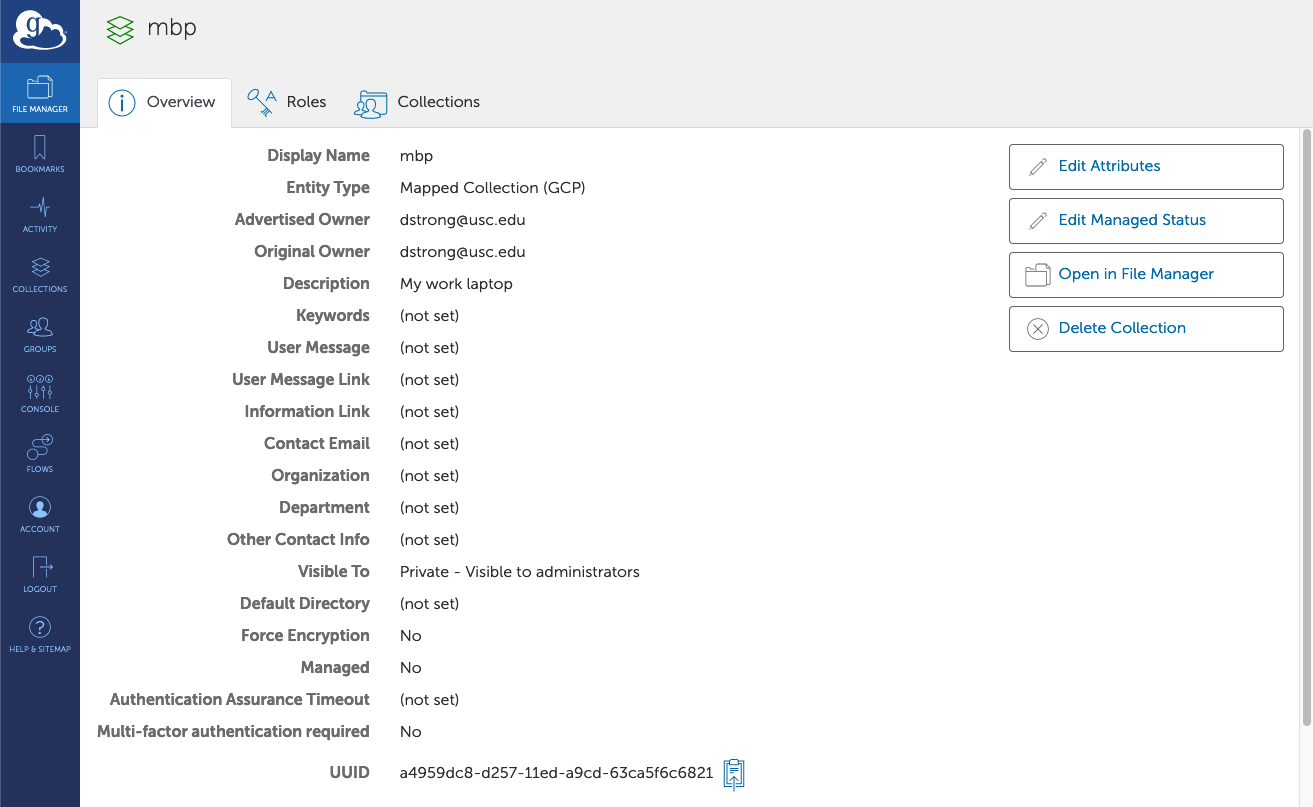
In the Globus user interface, navigate to the Collections page and select the "Administered by You" Quick Filter. You should see the local collection you just created with the name that you provided:
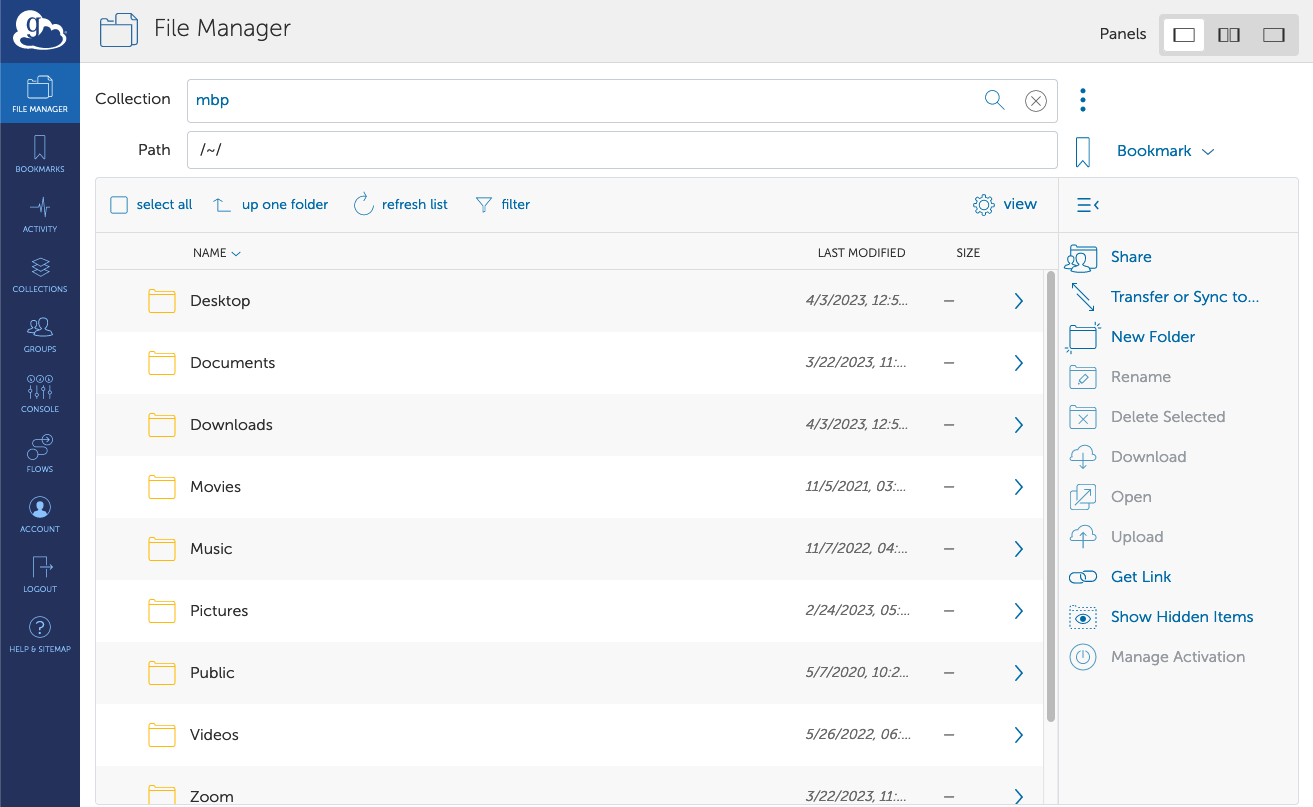
Click on the collection name and then on the next page, click Open in File Manager on the right hand side of the page:
This opens a listing of the files in the selected directory on your computer, including subfolders into which you can navigate:
By default, this will be your home directory on your local computer, but you can change this in the Globus Connect Personal preferences.
Allowing access to your local files
For security reasons, Globus requires you to specifically allow files and folders on your computer to be shared or transferred.
Windows
On Windows, to allow a folder's contents to be transferred, right click on the small g (the Globus icon) in your running task icons in the task bar.
Select the Options... menu item:

You will be presented with a window to add a folder containing the files you want to transfer. If you click the + sign in the lower right (highlighted in blue) you will be presented with a standard file explorer that gives you the ability to add a folder on your local hard drive. For now, only keep the Writable option checked and the Shareable option unchecked:
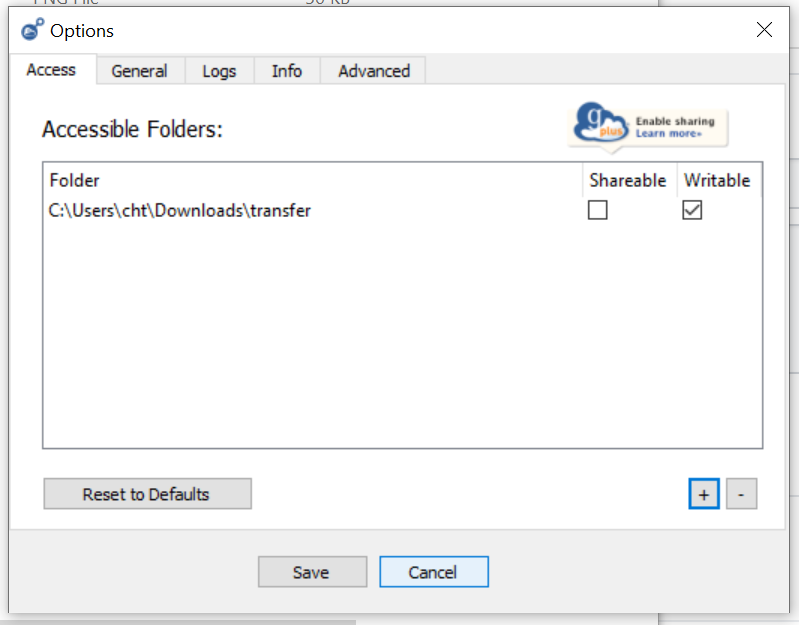
Click Save to continue.
macOS
On macOS, to allow a folder's contents to be transferred, access the small Globus g icon in the top menu bar and choose Preferences... and then the Access tab:

You will be presented with a window to add a folder containing the files you want to transfer. If you click the + sign in the lower left you will be presented with a standard file explorer that gives you the ability to add a folder on your local hard drive. For now, only keep the Writable option checked and the Shareable option unchecked.
Click Save to continue.
Setting up access to your CARC directories
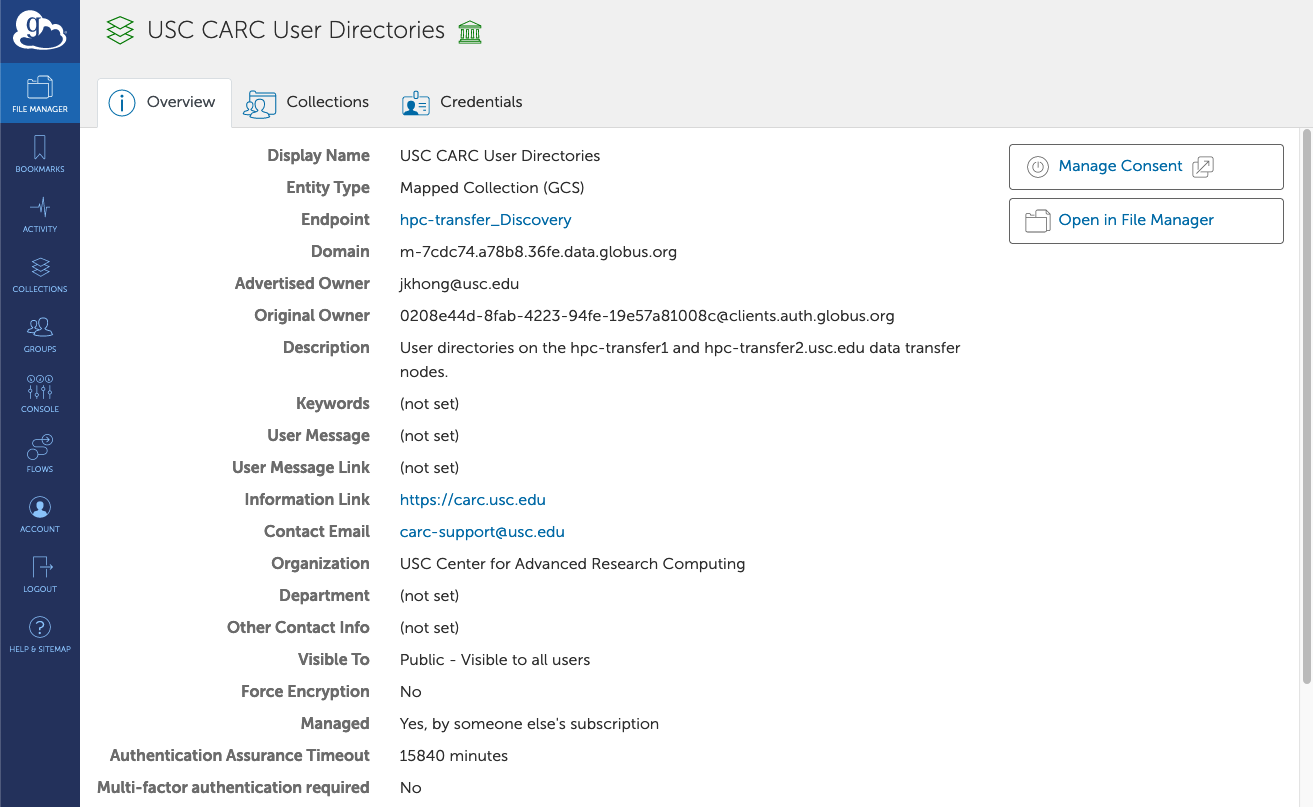
To set up access to your CARC /home1, /project, /scratch1, and /scratch2 directories on Discovery/Endeavour, click Collections in the left menu panel, uncheck all Quick Filters and search for "USC CARC User Directories". The USC CARC User Directories collection should appear in the search results:
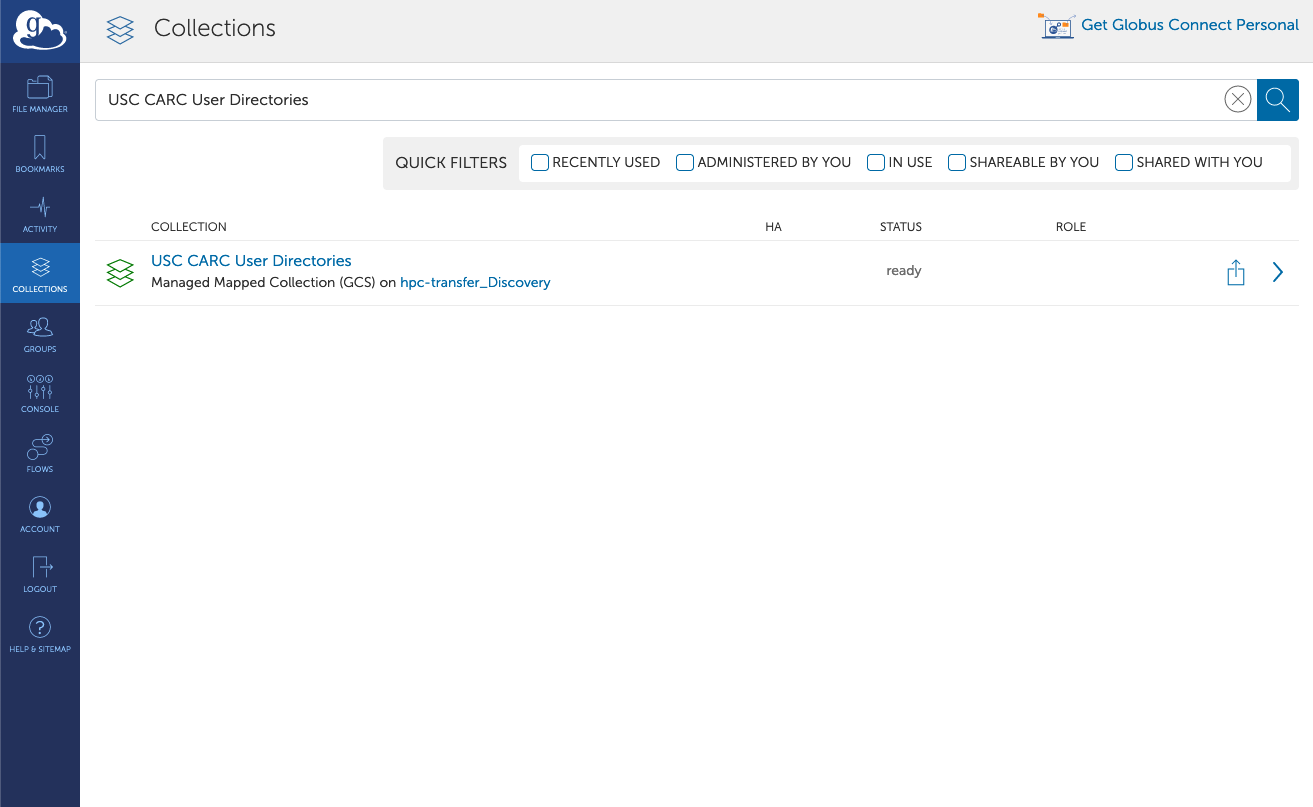
Click on the USC CARC User Directories collection and you will then be taken to the collection's main page:
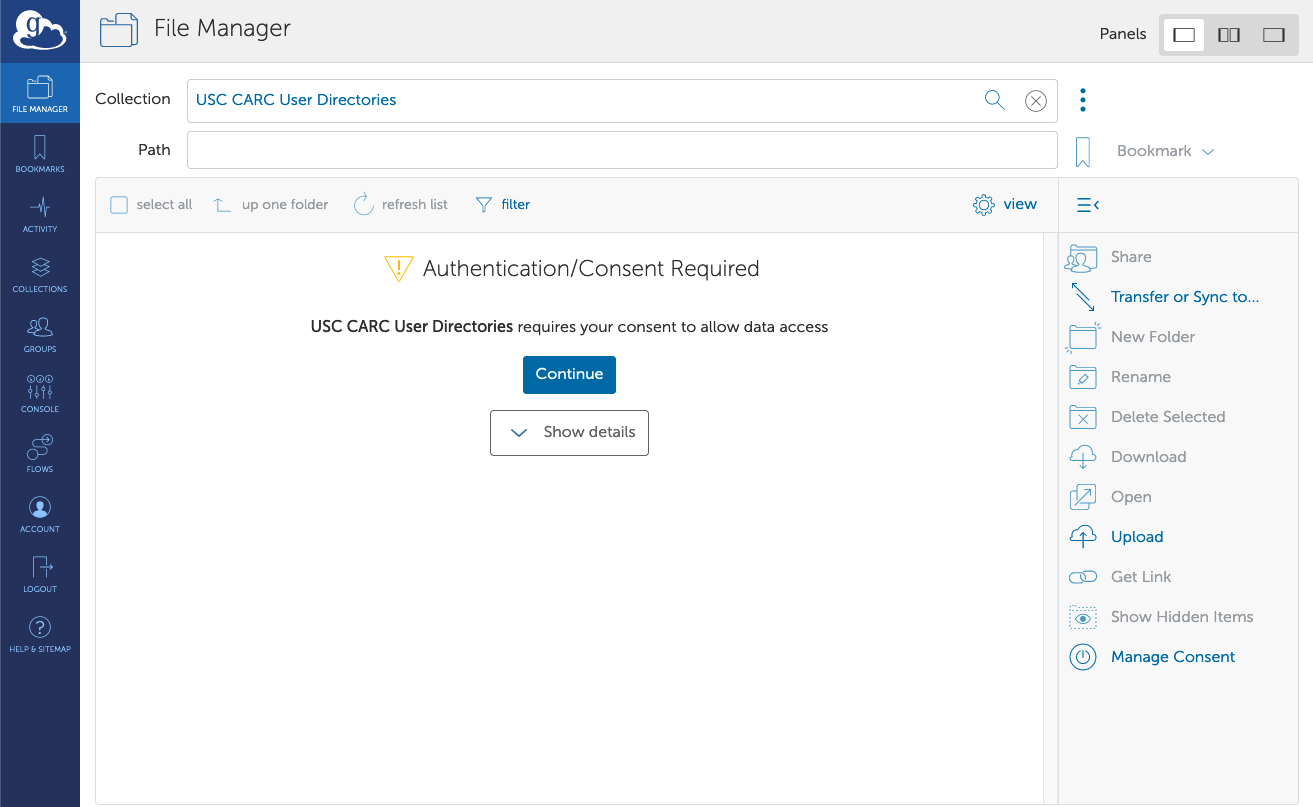
Click Open in File Manager on the right hand side of the page and you will see that authentication and consent are required for Globus to manage data access. Click Continue:
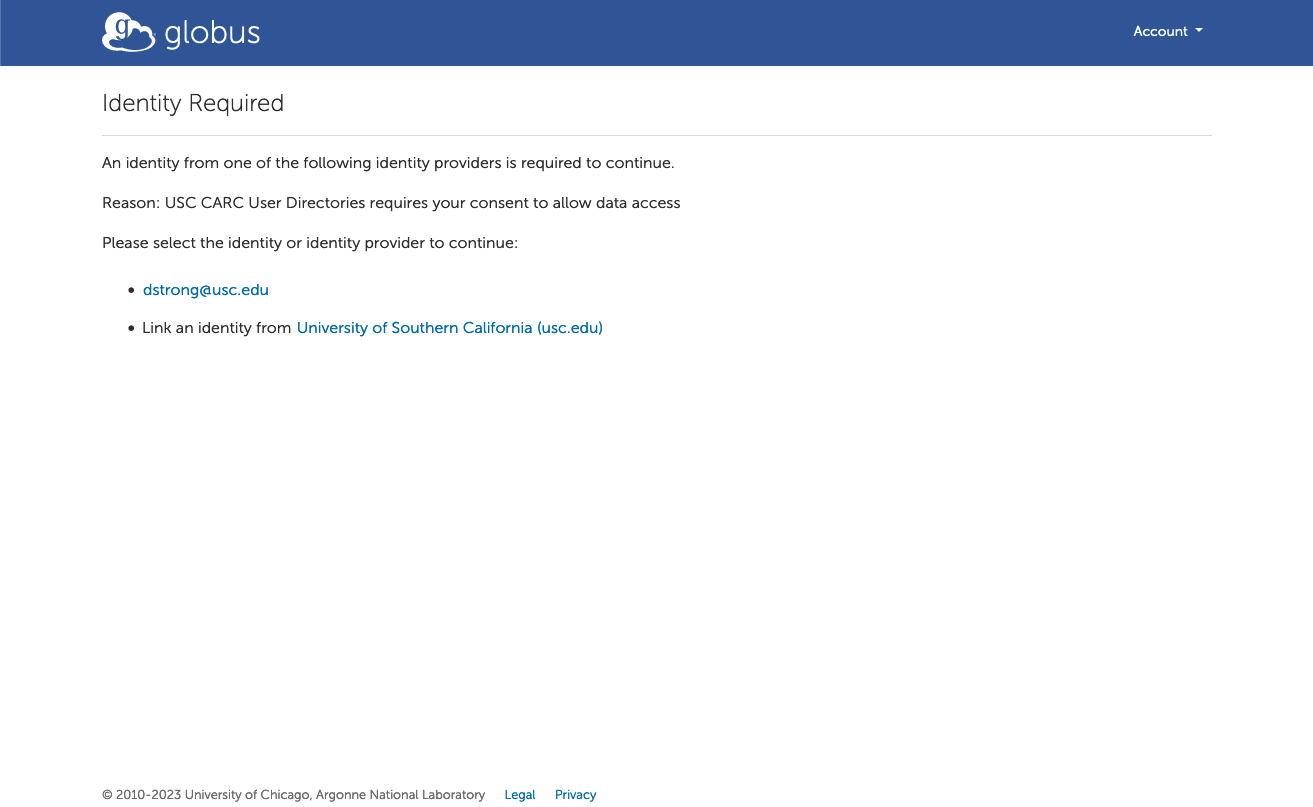
You will be asked to select your identity to continue. If you've already authenticated via Shibboleth, you should see your USC NetID listed. Otherwise, you will be prompted to log in with your NetID:
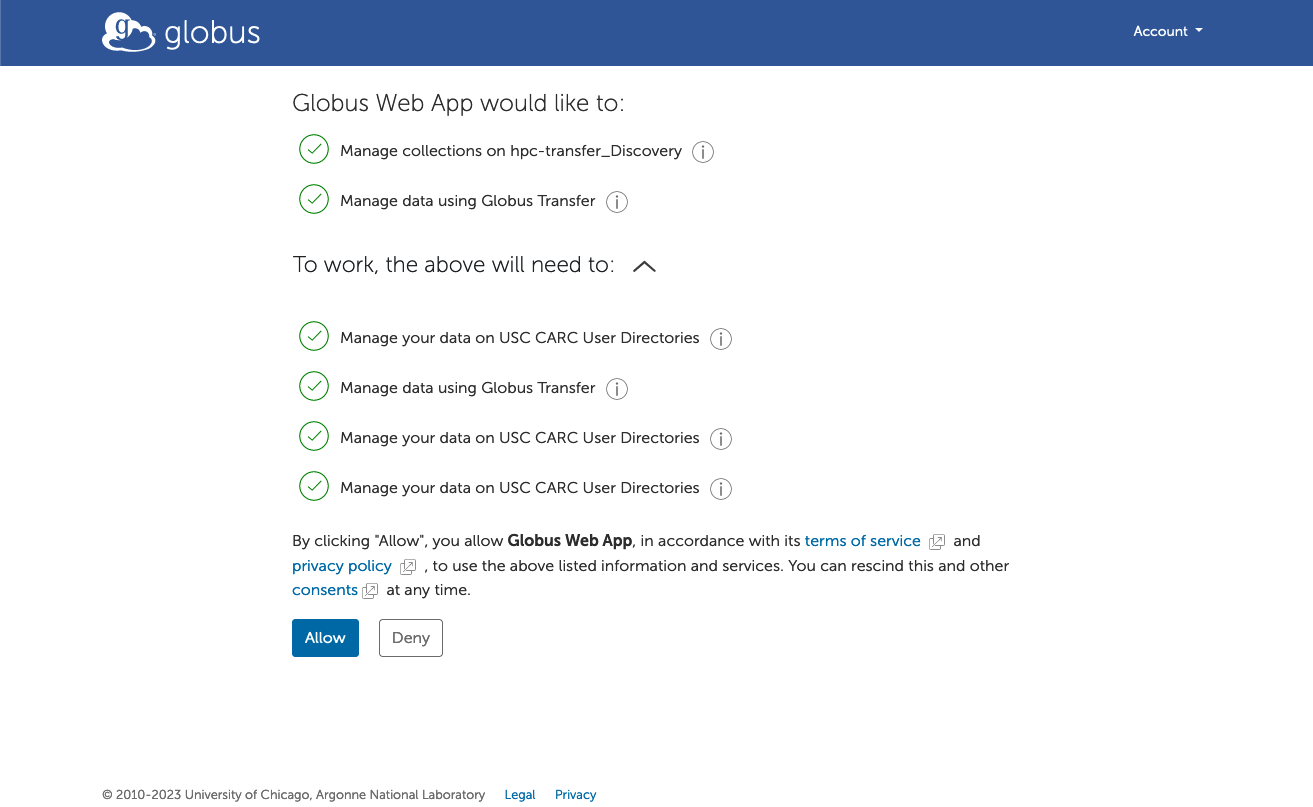
Click on your USC NetID. Select Allow to grant Globus a list of permissions:
After allowing Globus these permissions, you are redirected back to the File Manager where your CARC home directory (/home1) contents should be listed:
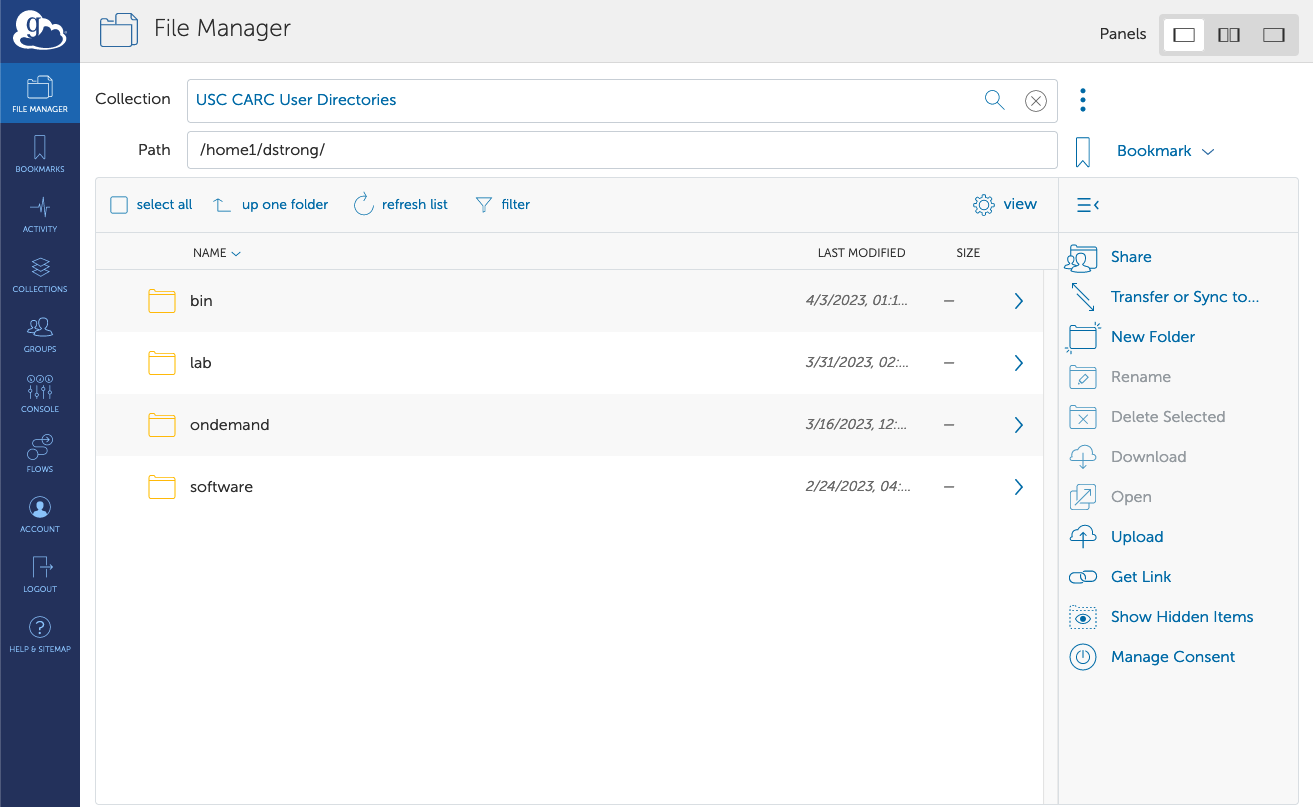
Using bookmarks
The File Manager offers a bookmark feature to access your most-used directories easily. Bookmark a directory by clicking the bookmark ribbon to the right of the Path field:
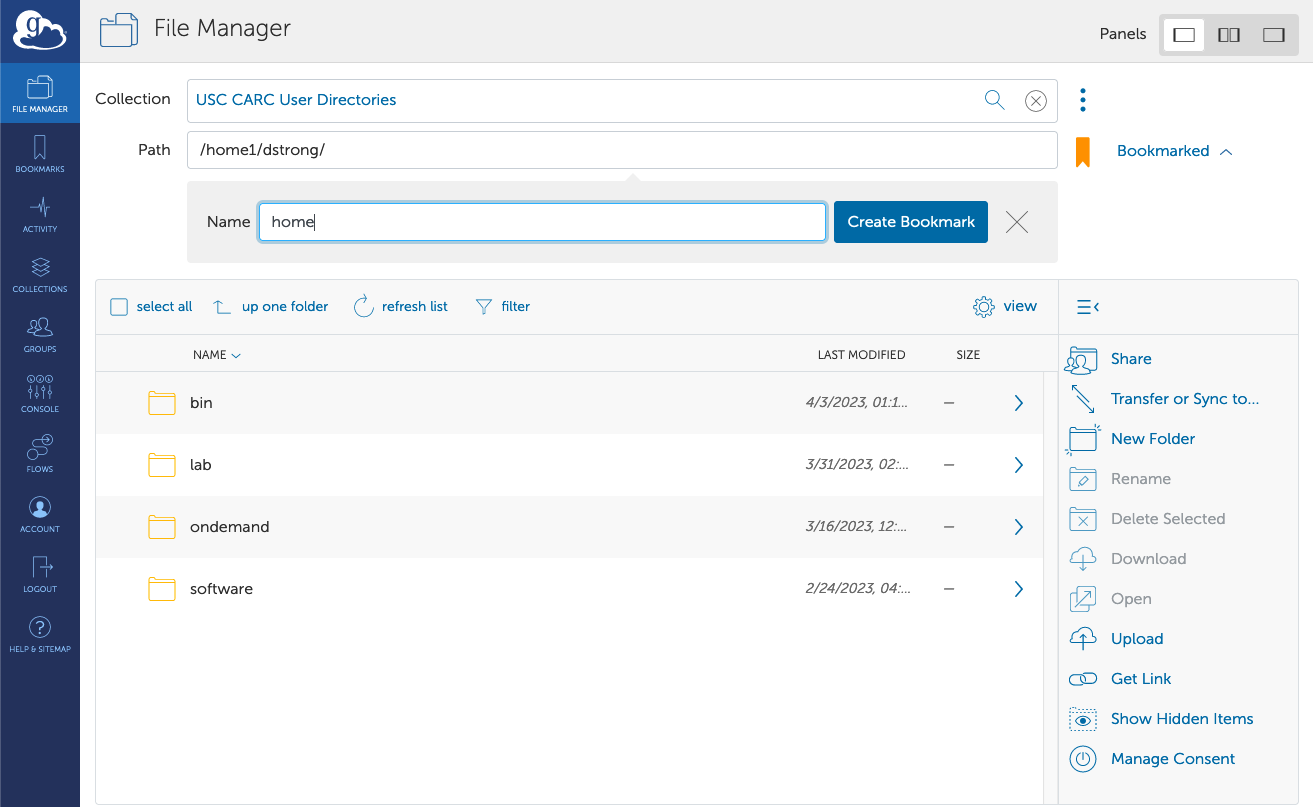
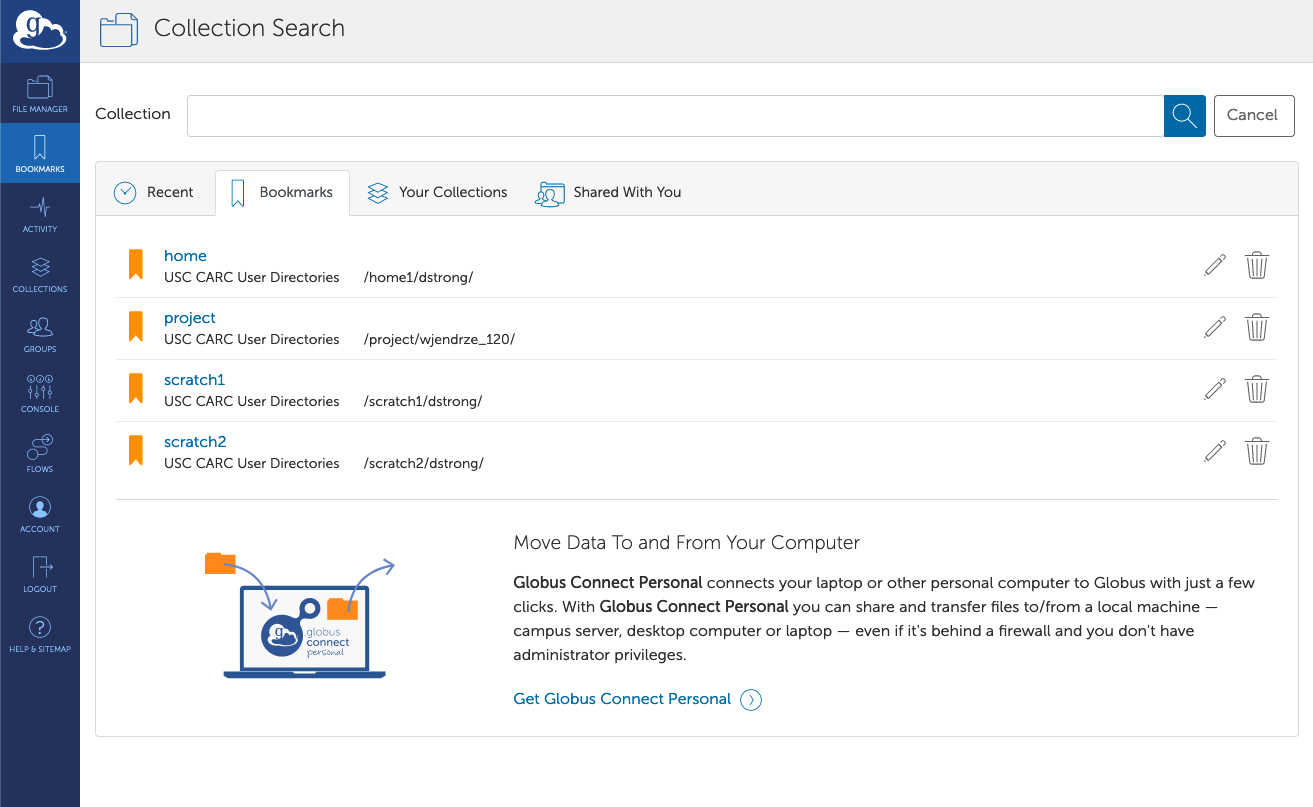
View and manage your bookmarks on the Bookmarks page:
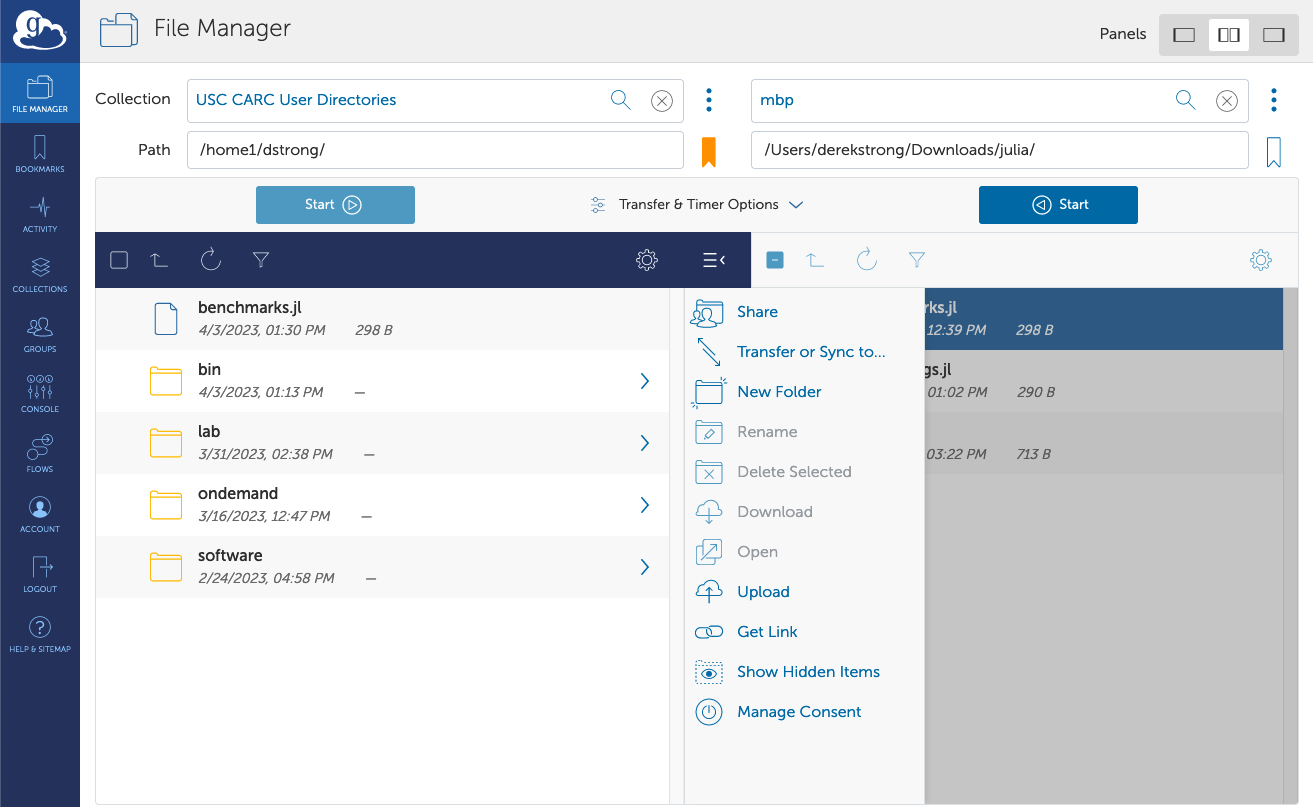
Transferring files
The File Manager page is also used for transferring files, and it can be configured to have a two-pane bi-directional layout. You can toggle the number and configuration of the two panes using the Panels menu in the top right of the File Manager page.
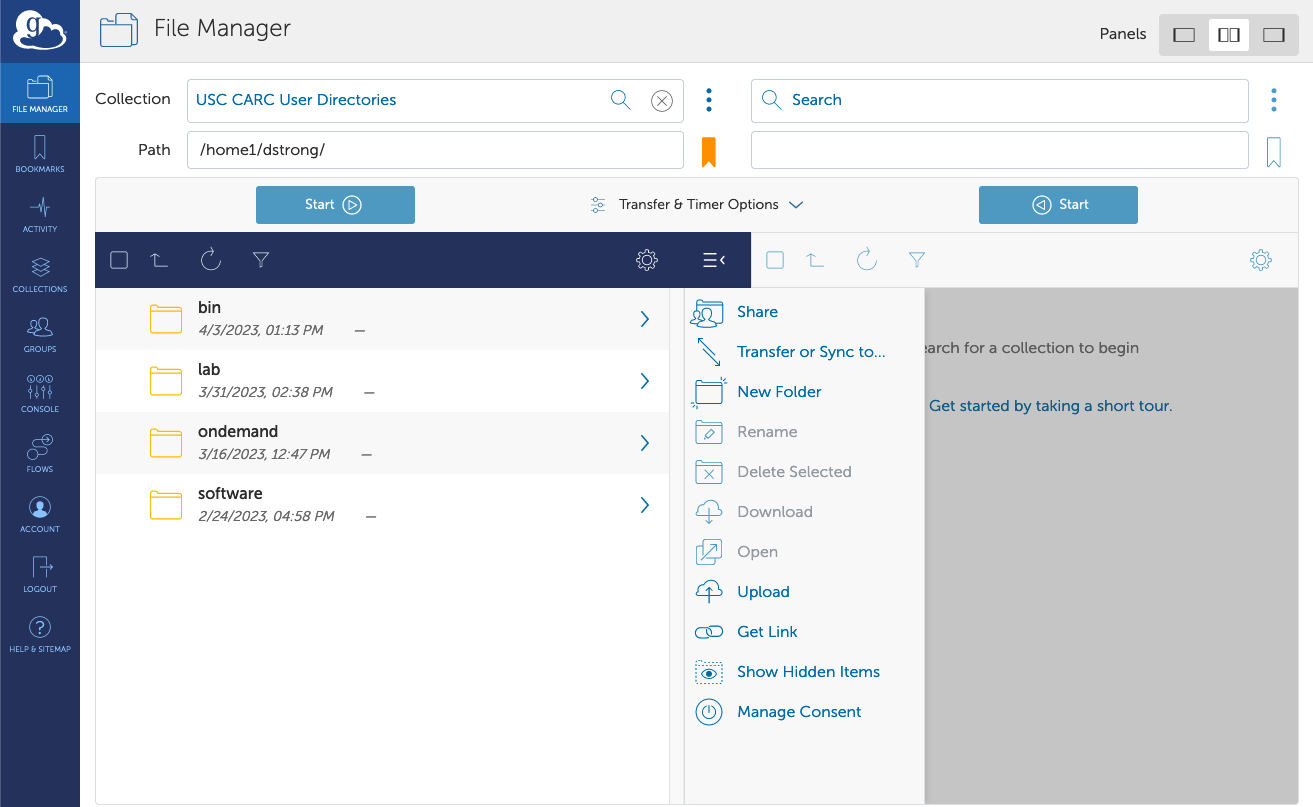
In the Collection search field at the top of either column, search for USC CARC User Directories to access your CARC directories. By default, you will be in your /home1 directory. You can navigate to other directories (/project, /scratch1, or /scratch2) by typing their paths in the Path field, or you can enter / to view all directories. You can also use bookmarks to make it easier.
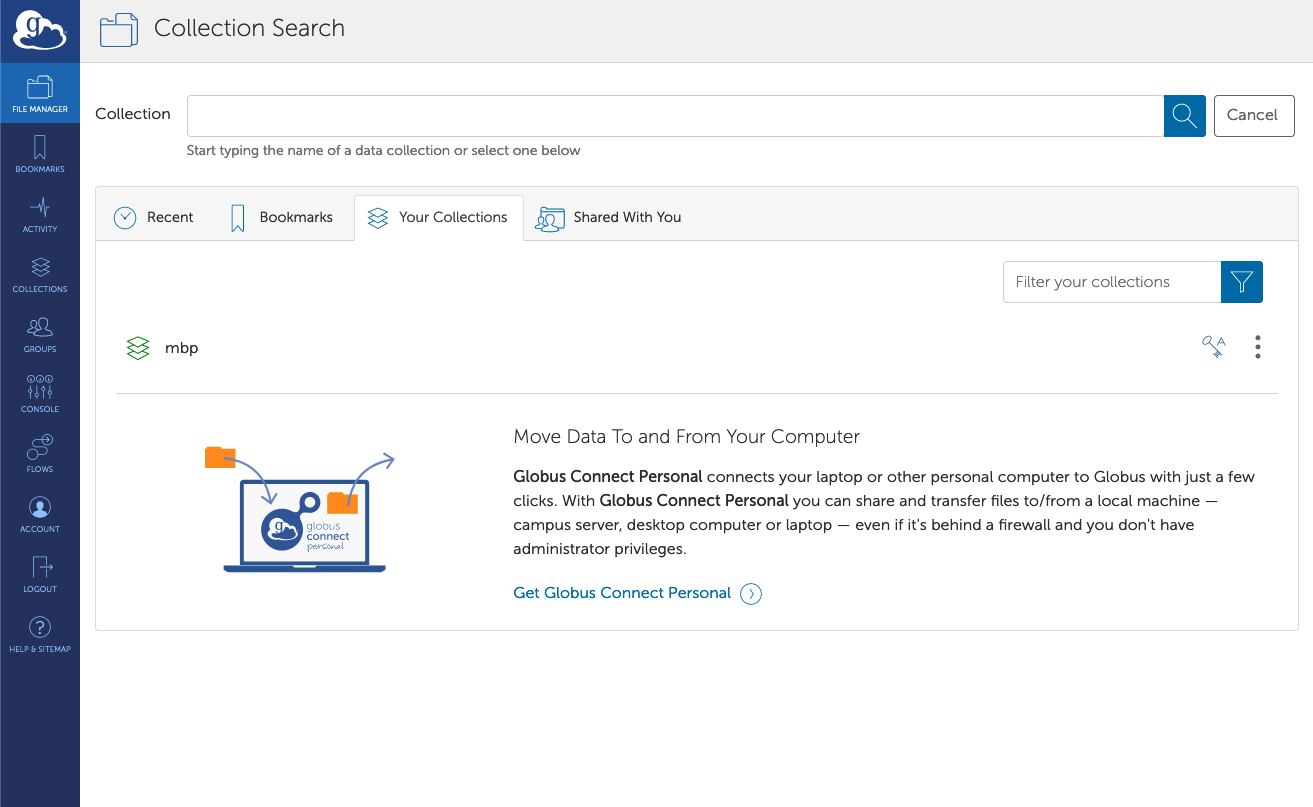
In the other column, you can click the Collection search field and navigate to the "Your Collections" tab, where you will find your personal computer's Collection you set up:
After selecting the two Collections and navigating to the desired directories, your File Manager page will look something like this:
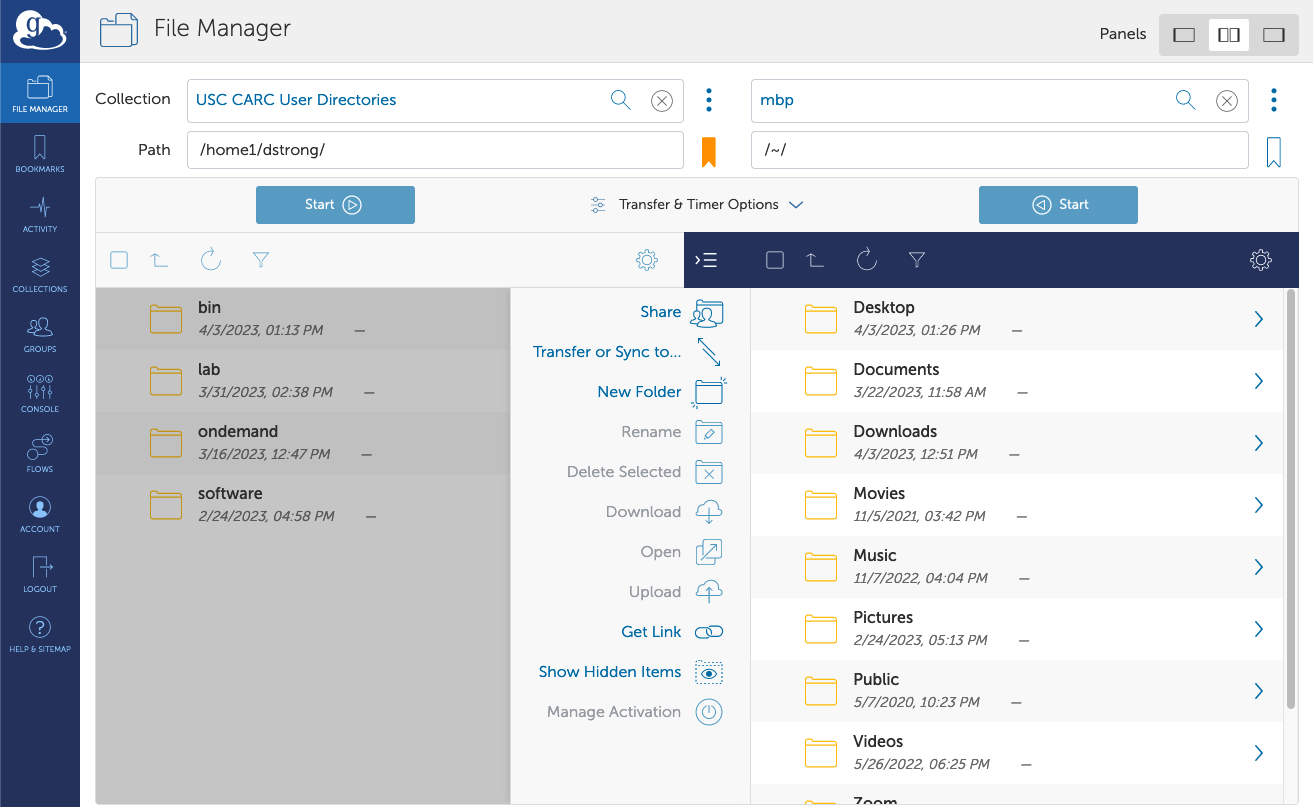
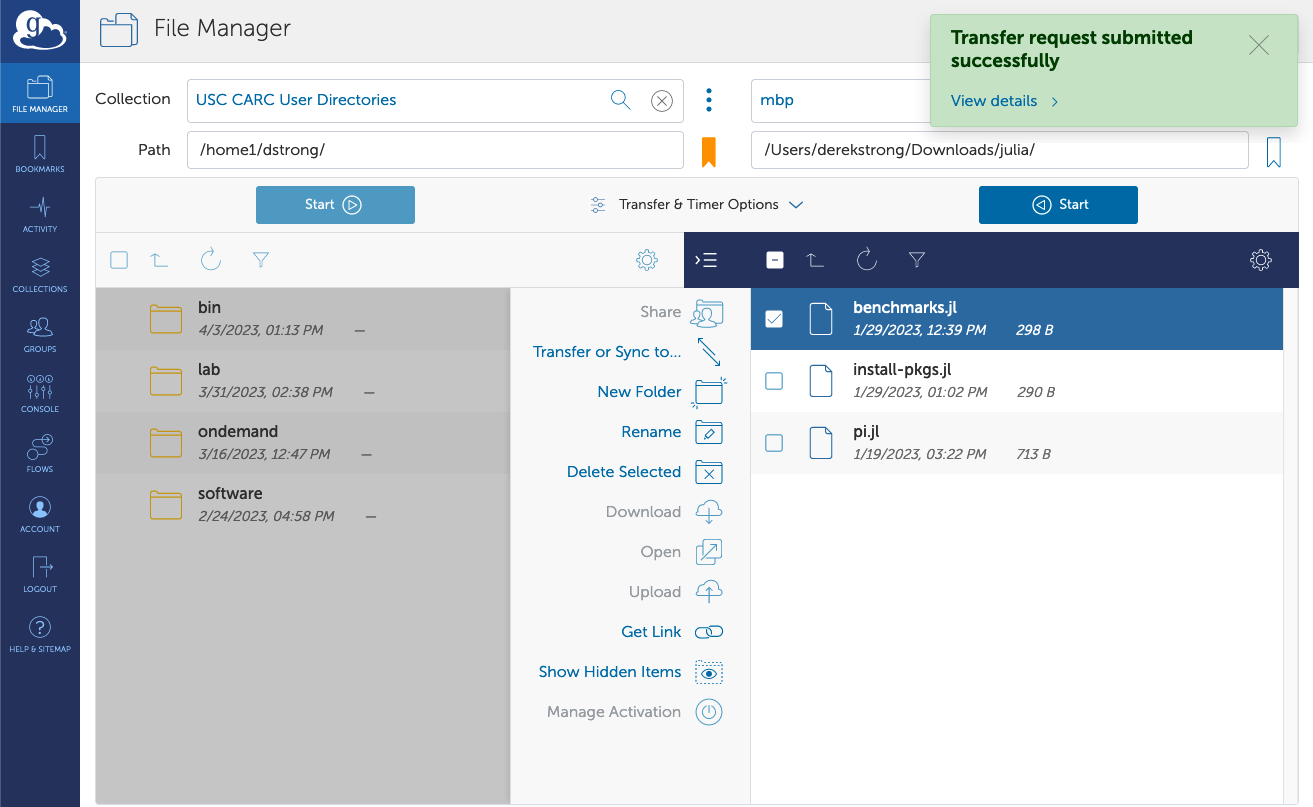
To begin an upload transfer, highlight one or more of the directories or files in your local computer and click the blue Start button in that column.
A green alert will appear in the upper right notifying you that the transfer was submitted and giving you the option to View details:
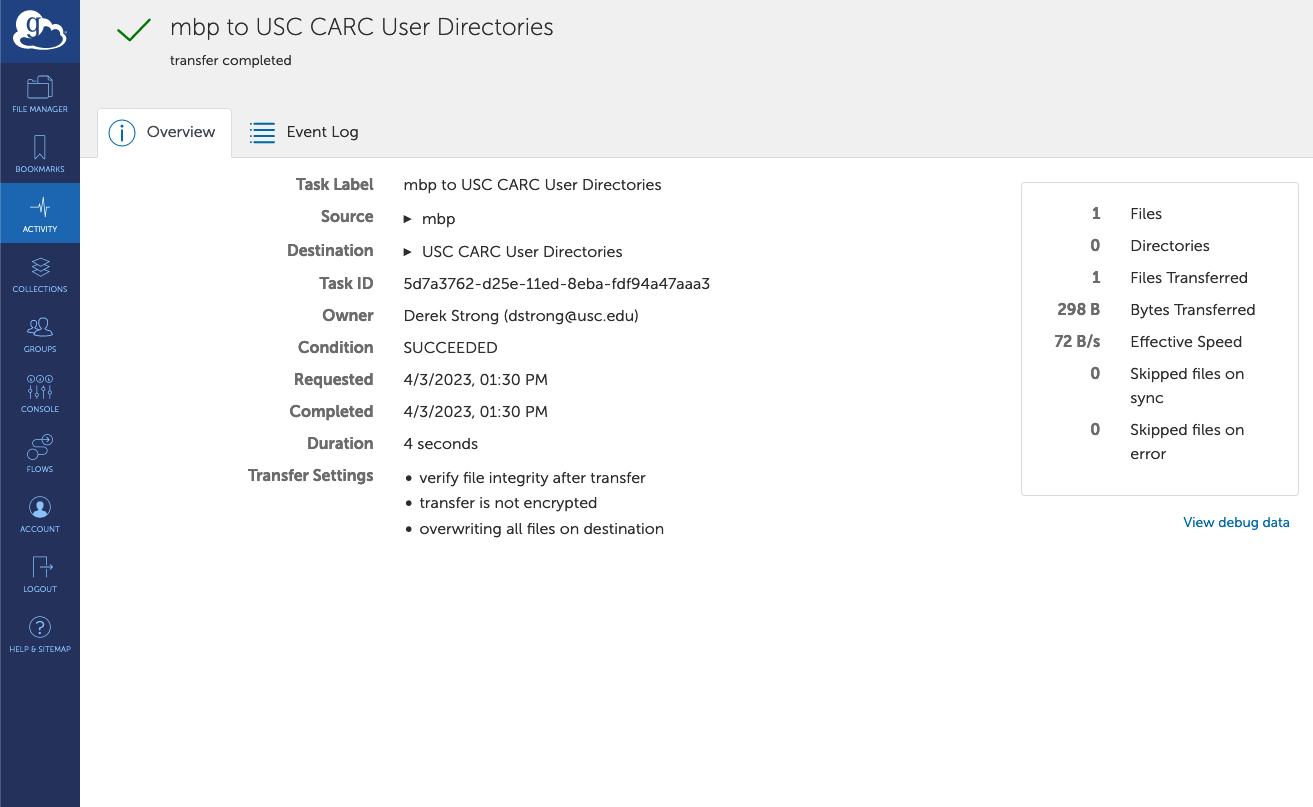
Clicking View details will take you to a page where you can watch the transfer's progress and view other information about your transfer:
If your files are large, Globus takes a few seconds or minutes to index them and get ready to transfer.
You will also receive an email notifying you of the file transfer success (or failure). Make a note of the Task ID in case your transfer fails and you need to restart it.
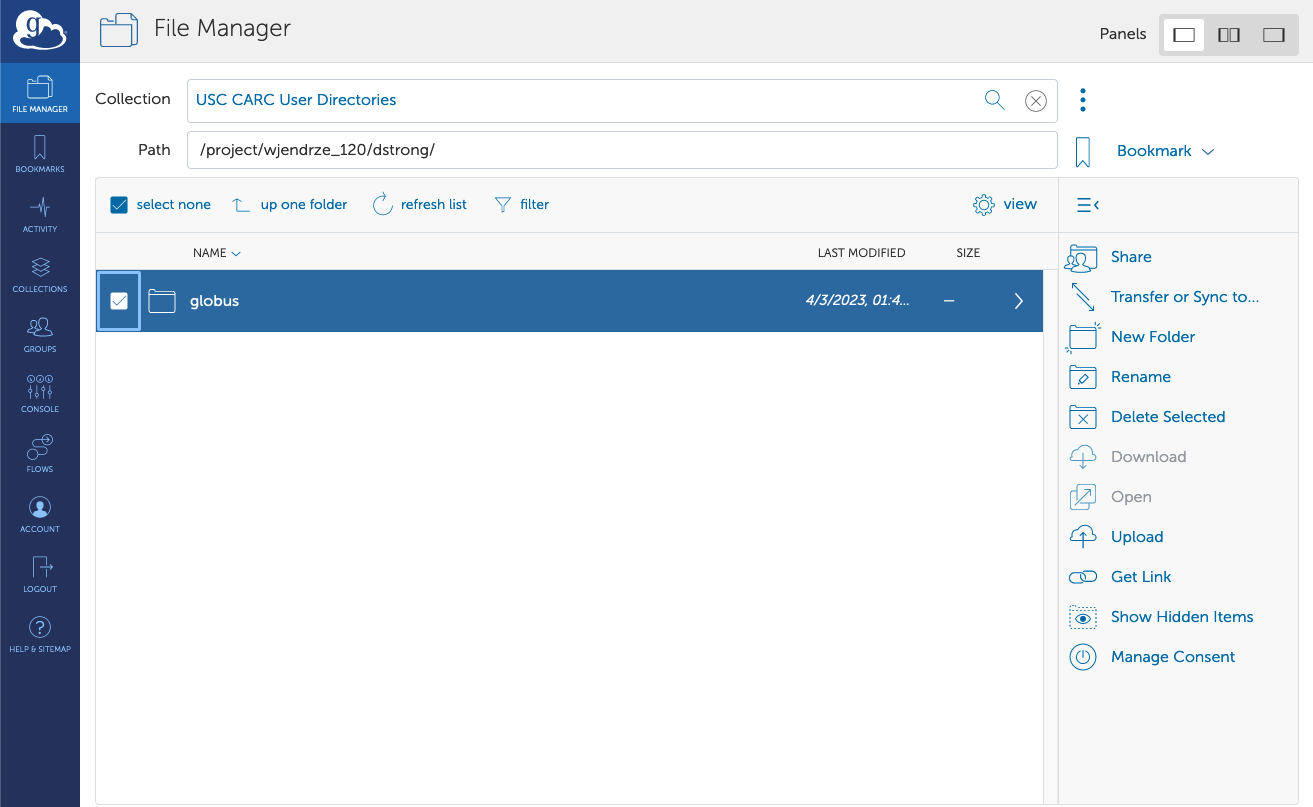
When your transfer completes, go back to the File Manager window. In the CARC directory column, select the refresh button in the middle menu (the right-curling arrow right under the Path field). This pulls an updated listing of the files in your CARC directory (in this example, the user's /home1 directory). If needed, scroll through the list and you will see your files there:
Tip: You don't have to transfer files one-by-one. By highlighting a folder and clicking the Start button, you can transfer the folder and all its contents.
Alternatively, to begin a download transfer, highlight one or more of the directories or files in your CARC directory and click the blue Start button in that column.
File transfer tips
- The CARC file systems are Linux-based. That means file and folder names are case sensitive and spaces and strange characters are awkward. Do not use characters like slashes and dollar signs in your file names if you are planning to upload them to CARC systems. Replacing spaces in file and folder names with an underscore or dash is recommended.
- Globus is capable of transferring a lot of small files, but in many cases you will get faster transfers and better results by creating a .tar, .gzip, or .zip file before trying to transfer data to or from CARC systems.
Syncing directories
Globus offers settings that can be applied to your transfer to synchronize your two directories. Syncing directories prevents the same files from being transferred repeatedly, saving you transfer time.
To synchronize your local directory and your CARC directory, access the Transfer & Sync Options menu located in between the two transfer columns. Select the "sync - only transfer new or changed files where the checksum is different" and "verify file integrity after transfer" checkboxes, and click the blue Start button to start your transfer:
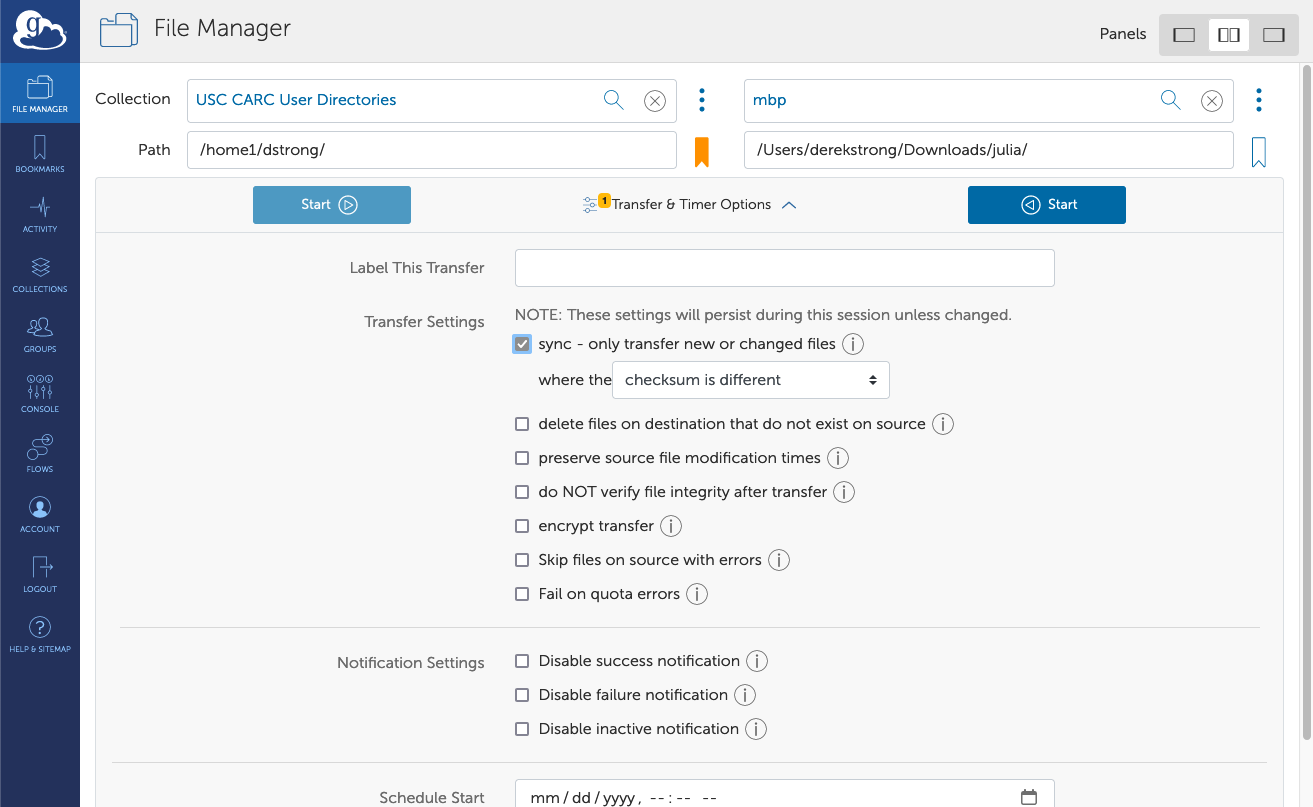
There is also an option to delete files in the destination directory if they aren't in the source directory, as well as options to preserve source file modification times and encrypt the file transfer.
Please note that Globus does not sync file permissions. If you want to also sync file permissions, you need to run an equivalent rsync command after the Globus transfer.
Restarting file transfers
If your transfer fails, you should first look at the last few events in the event log to identify any problems needing human intervention (quota exceeded, out of disk space, etc.). You can view event logs for transfers by navigating to the Activity tab in the left menu panel, selecting the transfer in question, and navigating to the transfer's Event Log tab:
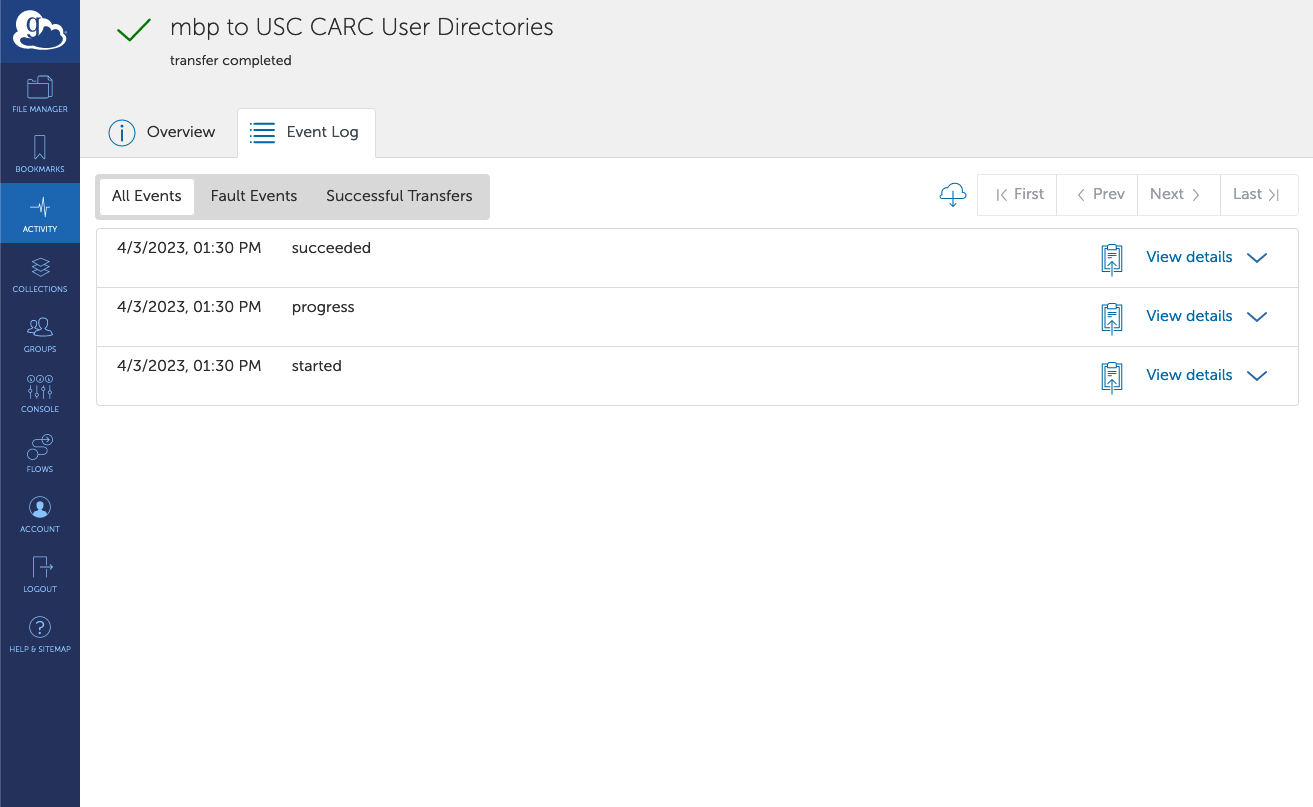
Note: This transfer was successful, but a failed transfer is accessed in the same way.
After fixing the issue that caused the transfer to fail, you can resubmit the transfer in the same way as you did originally, making sure to synchronize the two directories to avoid re-transferring other files (see the "Syncing directories" section above).
Sharing files
Globus also allows you to securely share files on CARC systems with external collaborators or data providers, if they have a Globus account. This feature allows external collaborators to both read and write files to a specific subdirectory within one of your directories on CARC file systems.
To set up sharing, begin by creating a subdirectory specifically for Globus data sharing via the File Manager. Create a new subdirectory using the New folder button:
Name the directory and click the green checkmark button to save it. Then, select the directory and select Share on the right side menu.
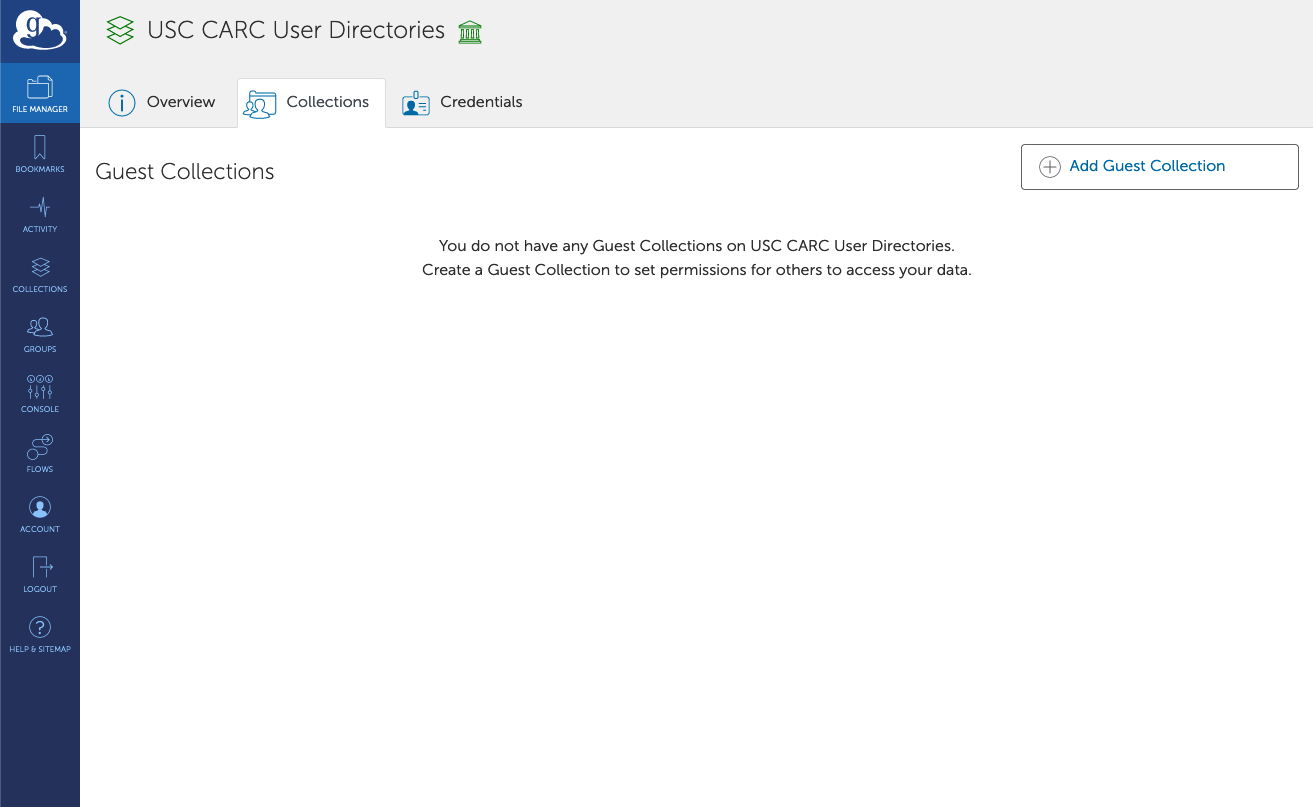
At the Authentication/Consent Required screen, select Continue. At the Guest Collections screen, click Add Guest Collection:
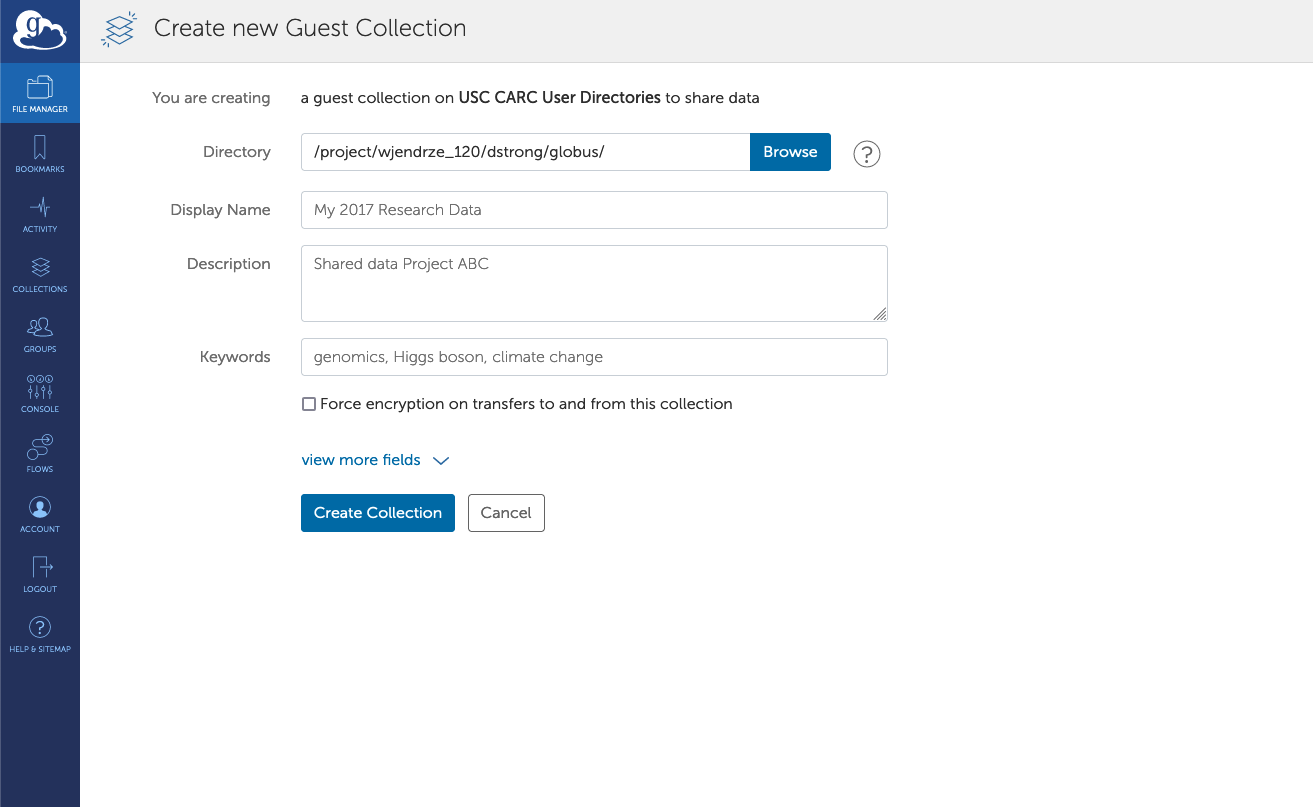
At the Create New Guest Collection screen, fill in the form and click Create Collection:
You will then be taken to a Permissions page for this new Guest Collection:
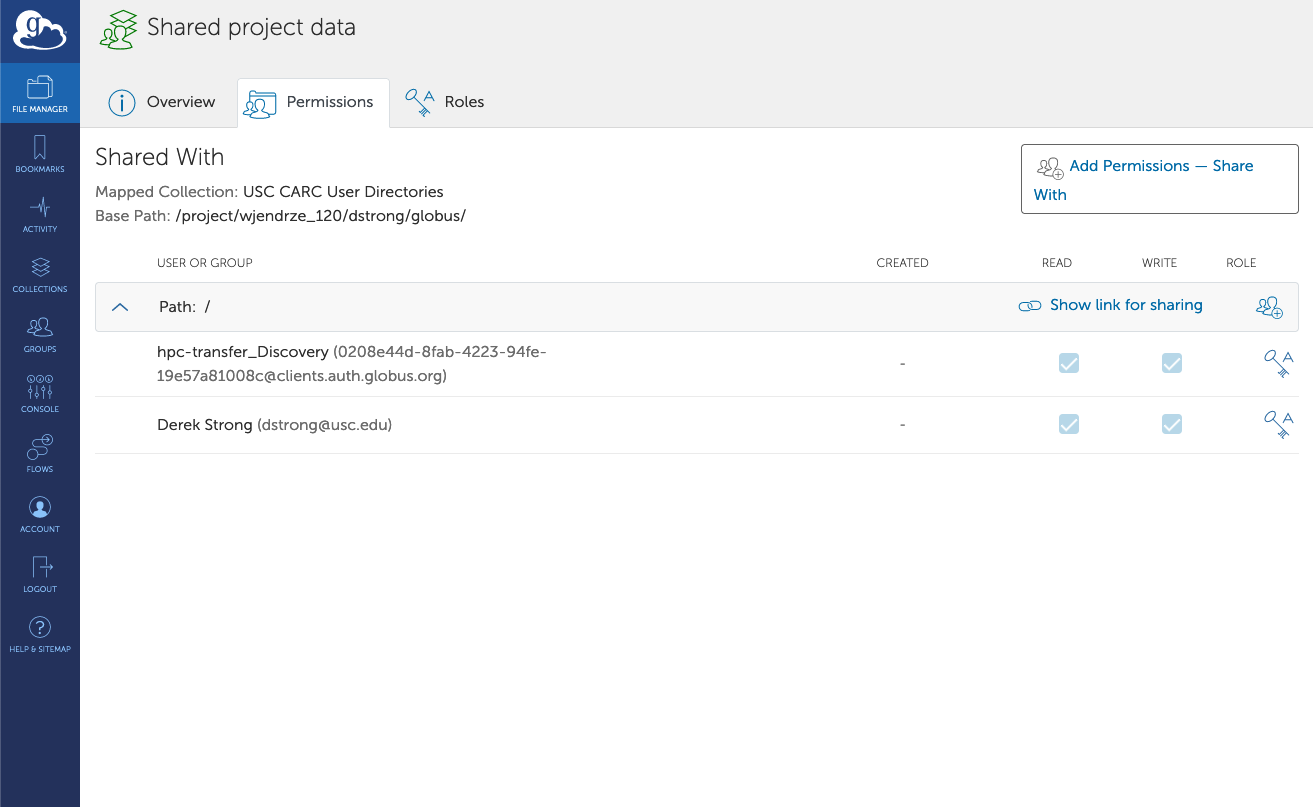
Select Add Permissions - Share With to provide read and/or write permissions to this subdirectory for your collaborators:
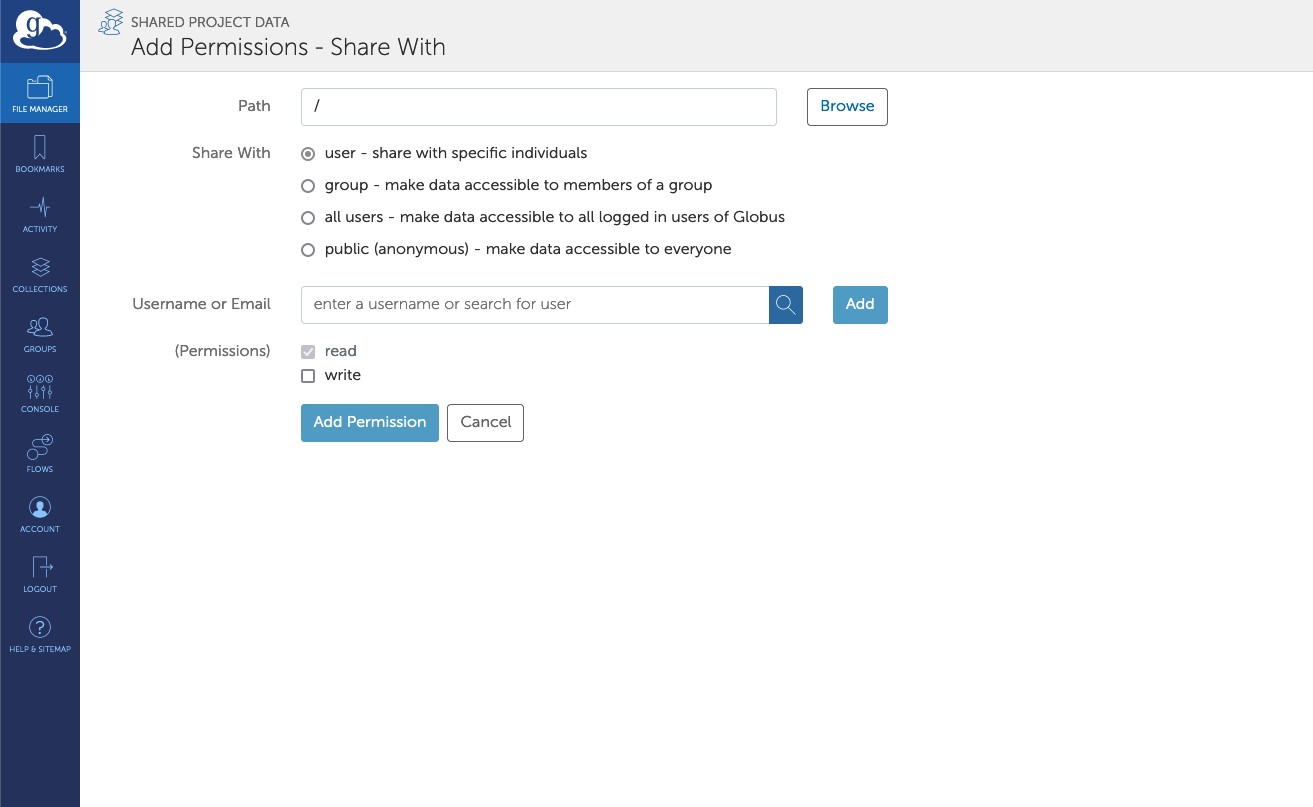
Note that the Path field is relative to the shared directory, so the default value of / is correct.
You can also create groups and manage permissions by group instead of individual.
In addition, you can provide public (anonymous) read access to your collection, so that anyone with a Globus account can download the files. It is also possible to create a research data portal based on Globus — contact us at carc-support@usc.edu for support.
For more details, see the official Globus docs:
- https://docs.globus.org/how-to/share-files/
- https://docs.globus.org/how-to/managing-groups/
- https://docs.globus.org/modern-research-data-portal/
Using the Globus CLI
Globus also provides a command-line interface that you can install; for more information, see the guide for Globus CLI.