
Getting Started with Discovery
This guide will help you get started with the Center for Advanced Research Computing's Discovery computing cluster by instructing you on how to log in, transfer data, and run jobs.
A CARC account is required to log in to and use CARC resources. For information on applying for a CARC account, see the Accounts and Allocations page.
If your project is located on the Endeavour condo cluster and not Discovery, see the Getting Started with Endeavour user guide. However, the contents of this Discovery guide will still be largely relevant to work on Endeavour, with the exception of the login node.
Overview
Discovery cluster
Discovery is CARC's general use high-performance computing cluster, which is a collection of computers and disk arrays that are connected via fast networks. Discovery allows USC researchers to perform computing tasks, like data analyses and simulations, on a larger scale than is possible with a laptop or lab workstation.
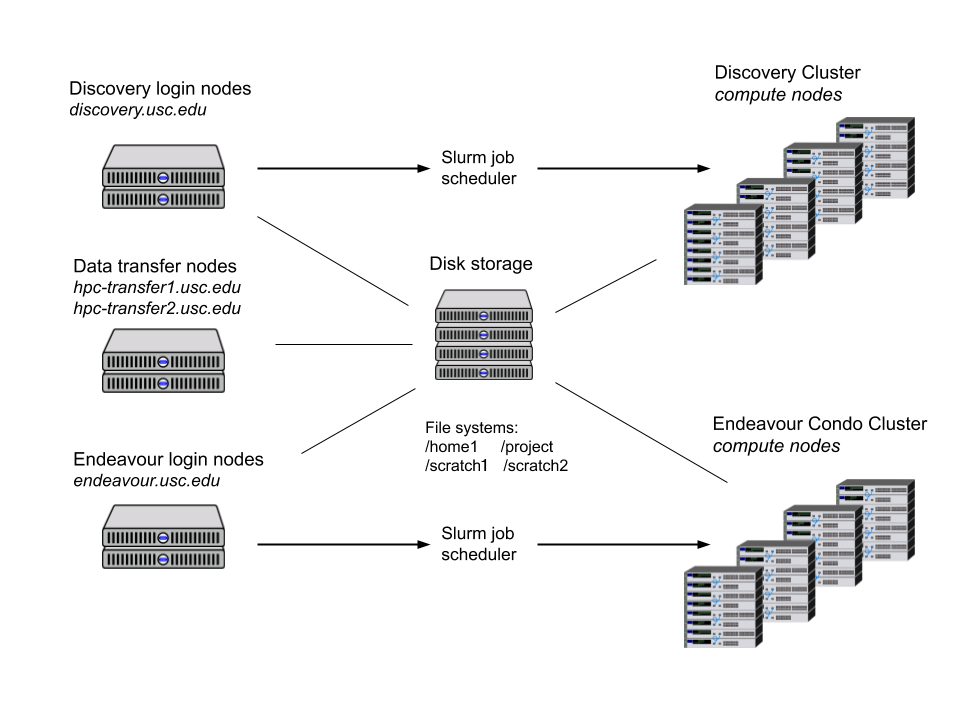
The following graphic depicts CARC's cyberinfrastructure and how different systems interact with one another:
When using Discovery, you will notice several differences from your desktop or laptop environment:
- The interface is command-line driven (no graphical user interface)
- Discovery uses the CentOS Linux operating system (not macOS or Windows)
- You submit your programs to a remote batch processing system, or job scheduler, to run them
Workflow
The workflow for using Discovery typically consists of the following steps:
- Connecting to the USC network or VPN
- Logging in to the login node
- Organizing files
- Transferring files
- Installing and running software
- Testing your job interactively on a compute node
- Submitting your job to the job scheduler to run it remotely on a compute node
- Monitoring your job and checking the results when it has completed
Connecting to the USC network or Research VPN
Discovery requires users to connect to the USC Secure network while on campus. For off-campus users, a connection to a USC VPN needs to be set up before accessing CARC systems. Instructions for connecting to a USC VPN can be found here.
Duo 2FA is required to access the VPNs. If you have not already signed up for Duo on your USC NetID account, please visit this page to enroll.
Logging in
To log in to the Discovery login node (also known as the head node), you will need to use a secure shell client. This is a small application that enables you to connect to a remote computer via SSH (Secure SHell), a cryptographic network protocol for securely operating network services. You will need your USC NetID to SSH in to the login node.
Note: Accessing the cluster via the Remote SSH extension of VSCode may be blocked. This extension spawns too many processes on the login nodes, exceeding the process limit. Additionally, the processes started by Remote SSH are not properly killed after the user logs out of the application, which may lead to an account hold preventing the user from accessing the cluster, even from the terminal. It is recommended to use the SSH-FS extension in VSCode instead. These measures are set in place to prevent the login nodes, as shared resources, from becoming saturated and sluggish. To read more about process limits on login nodes, see the Running Jobs on CARC Systems page.
→ SSH login: macOS and Linux
macOS users can connect to Discovery using the Terminal application that is natively installed. Linux users can similarly use the natively installed terminal application that comes with their distribution of Linux (e.g., Terminal on Ubuntu).
To connect, open a new terminal window and enter:
ssh <username>@discovery.usc.eduMake sure to substitute your USC NetID as the username. This is the same username for your USC email account (e.g., ttrojan@usc.edu's NetID is ttrojan). After entering the command, you will then be prompted to enter your USC NetID password. This is the same password for your USC email account.
Note: There will be no visual feedback as you enter your password. This is a security feature designed to obscure your password and is expected.
→ SSH login: Windows
Windows users may need to download and install a third-party SSH client to connect to Discovery. A popular client is PuTTY, which is available through the developer’s website. Another popular option is MobaXterm, which also provides file transfer capabilities. It is also available through the developer's website. On Windows 10, there is a natively available Windows Terminal that has a built-in SSH client.
Whichever option you choose, you will log in using your USC NetID and password. Your NetID is the same username for your USC email account (e.g., ttrojan@usc.edu's NetID is ttrojan). Your USC NetID password is the same password for your USC email account.
Windows Terminal
To connect using Windows Terminal, open a new terminal window and enter:
ssh <username>@discovery.usc.eduMake sure to substitute your USC NetID as the username. You will then be prompted to enter your USC NetID password.
PuTTY
To connect using PuTTY, start in the Configuration window under the Session category and enter discovery.usc.edu as the hostname with port 22 and select Connection type: SSH. Then select Open to open a connection window, enter your USC NetID as the username, and finally enter your USC NetID password.
Note: There will be no visual feedback as you enter your password. This is a security feature designed to obscure your password and is expected.
MobaXterm
There are two ways to connect using MobaXterm. If you prefer the command-line interface, select "Start local terminal" and follow the instructions above using the Windows Terminal. If you prefer a GUI interface, select the icon "Session" on the top left corner (or, Sessions > New Session from the menu at the very top of the window). When prompted to choose a session type, choose "SSH." Under "Basic SSH Settings" enter discovery.usc.edu as "Remote Host" and enter your USC NetID as the username after checking "Specify Username". Keep the port as 22. There are additional settings below that you may want to adjust as necessary, particularly the Bookmark settings if you want a shortcut. Click OK to open your SSH session. Enter your USC NetID password when prompted for a password to finish logging in.
If you are having issues with the MobaXterm SSH session disconnecting due to timeout/inactivity, click the "Settings" icon from the top menu. Then click to the SSH tab and under "SSH Settings" make sure to check "SSH keepalive" and then click OK. Restart MobaXterm and try again.
SSH keys
You can find instructions for setting up SSH keys for faster login here on our User Forum.
Note: CARC does not manage your USC NetID password. If you are having difficulty using your USC NetID and/or password, please contact USC IT Services.
Organizing files
File systems
All CARC account holders are assigned four directories on four file systems where they can store files and run programs:
- /home1
- /project
- /scratch1
- /scratch2
These are global file systems in that you can access them from any Discovery or transfer node.
Use the myquota command to see the directories you have access to along with quota information.
→ Home file system
The /home1 file system consists of personal directories for CARC users. Each CARC user has a home directory with 100 GB of disk space intended for storing personal files, configuration files, and software. I/O-intensive jobs should not be run directly from your home directory.
We keep two weeks of snapshots for home directories. You can think of these snapshots as semi-backups, meaning that if you accidentally deleted some data we would be able to recover it within two weeks. If the file was created and deleted within a one-day period, then the snapshot cannot recover it. You should always keep extra backups of your important data and other files because of this.
When you log in to Discovery, you will always start in your home directory. Your home directory is located at:
/home1/<username>Use the cd command to quickly change to your home directory.
→ Project file system
The /project file system is a high-performance, parallel file system consisting of shared directories for different research project groups. Project directories are intended for sharing files among a research group and should be used for most of your CARC work. Each project member has access to their group's project directory, where they can store data, scripts and related files, and install software. Users affiliated with multiple CARC projects will have access to multiple project directories.
A project's PI must request a project storage allocation via the CARC User Portal. The default quota for each project directory is 5 TB. Each PI can request up to 10 TB of storage across their project(s) at no cost. If more than 10 TB is needed, a PI can request additional storage space in 5 TB increments at a cost of $40/TB/year. For more information on storage quotas and pricing, see the Accounts and Allocations page.
We keep two weeks of snapshots for project directories. You can think of these snapshots as semi-backups, meaning that if you accidentally deleted some data we would be able to recover it within two weeks. If the file was created and deleted within a one-day period, then the snapshot cannot recover it. You should always keep extra backups of your important data and other files because of this.
Project directories are located at:
/project/<PI_username>_<id>where <PI_username> is the username of the project owner and <id> is a 2 or 3 digit project ID number (e.g., ttrojan_123).
You can also find the project ID and path on the project page in the User Portal.
To create your own subdirectory within a project directory, enter a command like the following:
mkdir /project/<PI_username>_<id>/<username>where <username> is your USC NetID (your email address without "@usc.edu").
→ Scratch file systems
The /scratch1 and /scratch2 file systems are high-performance, parallel file systems intended for temporary files and I/O operations. Each CARC user has a /scratch1 directory with 10 TB of disk space and a /scratch2 directory with 10 TB of disk space. /scratch1 is preferred because it is newer and has better read/write speeds than /scratch2.
The files stored in both scratch file systems are not backed up in any way. Files on these file systems may be purged every so often (with advanced warning). If needed, files stored here should be periodically backed up to decrease the risk of data loss.
Your /scratch1 directory is located at:
/scratch1/<username>Use the cds command to quickly change to your /scratch1 directory.
Your /scratch2 directory is located at:
/scratch2/<username>Use the cds2 command to quickly change to your /scratch2 directory.
Sensitive data
Currently, CARC systems do not support the use or storage of sensitive data. If your research work includes sensitive data, including but not limited to HIPAA-, FERPA-, or CUI-regulated data, see our Secure Computing user guides or contact us at carc-support@usc.edu before using our systems.
Transferring files
CARC has two dedicated data transfer nodes at hpc-transfer1.usc.edu and hpc-transfer2.usc.edu that are configured for fast file transfers. These nodes are also Globus endpoints. To access these nodes, use one of these hostnames instead of the usual login hostname (discovery.usc.edu) when logging in. For example, to log in to a transfer node:
ssh <username>@hpc-transfer1.usc.eduRemember to always transfer files into directories where you have sufficient storage space available.
Between your local machine and Discovery
There are a number of ways to transfer files between your local machine and Discovery. These include the commands sftp or rsync as well as GUI apps like Cyberduck or FileZilla.
From the internet to Discovery
You can transfer a file from the public internet directly to one of your directories on Discovery by using commands like wget, curl, or aria2c or, for Git repositories, the various git commands.
For more information on transferring files, see the Data Management and File Transfers user guides.
Creating and editing text files
It's possible to create files on your personal computer and transfer them to Discovery, but it is typically more efficient to create them directly on Discovery. For plain-text files, you can use the nano, micro,vim, or emacs text editors. We recommend the Micro editor for users new to the command line; Vim and Emacs both have steeper learning curves, but you may eventually find them more useful and productive.
Links to text editors' webpages:
To use one of these editors, load the corresponding software module (e.g., module load micro).
To create a new file, simply enter the editor name as the command (e.g., micro). You can specify the filename when saving the file.
To edit an existing file, enter the editor name as the command and then the path to the file as the argument (e.g., micro script.R).
Installing and running software
On Discovery, CARC maintains software, compilers, and libraries using the module system. These may satisfy your computing requirements without any further installations.
To see the list of available software, enter the command:
module availTo load software based on this list, such as Python, enter the command:
module load pythonThis loads the default version of Python. Then, for example, enter python to begin an interactive Python session.
For more information on the software module system, see our Software Module System user guide.
Researchers are encouraged to install any software, libraries, and packages necessary for their work. Consult the software's documentation on how to install from source or with pre-built binaries. Additionally, for a more controlled and portable computing environment, consider using a Singularity container for your software builds.
For more information on installing and using software, see the Software and Programming user guides.
Note: The login node is a shared resource that is used by many users simultaneously. Be careful not to do tasks on the login node that will negatively impact other users, or we may terminate your process without warning. You may run small tests on the login node, but beyond that you should use the compute nodes.
Running jobs
A job consists of all the data, commands, scripts, and programs that will be used to obtain results. Because the Discovery computing cluster is a shared system, we use a job scheduler to manage all requests for resources. The Slurm (Simple Linux Utility for Resource Management) job scheduler is an open-source job scheduler that allocates compute resources on clusters for queued, user-defined jobs. It performs the following functions:
- Schedules user-submitted jobs
- Allocates user-requested compute resources
- Processes user-submitted jobs
Jobs also depend on your project account allocations, and each job will subtract from your project's allocated system units. Use the myaccount command to see your available and default accounts and usage for each account.
For more information on creating and submitting Slurm job scripts, see the Running Jobs user guide. A listing of common Slurm commands can be found here.
→ Testing your job
We recommend that you first perform some basic tests of your job interactively on a compute node before submitting it as a batch job to the Slurm job scheduler, ensuring that you will have quality results after the job completes. You can do this by requesting an interactive session with a compute node using the salloc command.
For example, to request 1 CPU and 2 GB of memory for one hour (the default allocation request), enter:
salloc --time=1:00:00 --account=<project_id>Make sure to use the correct account for your jobs. Without the --account option, your default account will be used. This is fine if you only have one project account.
After running the command, the job scheduler will add your interactive job to the job queue. Once your job starts, you can then test by loading the software environment and running scripts or programs. Once you are confident that your job will run correctly, you are ready to submit a batch job through Slurm.
→ Submitting your job
After you have tested your job interactively and achieved the results you want, you can now submit your batch job to Slurm.
To submit a job, first create a Slurm job script using one of the previously mentioned text editors.
Your job script should look something like this:
#!/bin/bash

#SBATCH --account=<project_id>
#SBATCH --partition=main
#SBATCH --nodes=1
#SBATCH --ntasks=1
#SBATCH --cpus-per-task=4
#SBATCH --mem=16G
#SBATCH --time=1:00:00

module purge
module load gcc/11.3.0
module load python/3.9.12

python3 script.py
The top few lines of the file (that begin with #SBATCH) specify the requested resources for your program and other options. Make sure to use the correct account in your job scripts. Without the --account option, your default account will be used. This is fine if you only have one project account.
The next set of lines loads the required software modules (module load ...). After that, the remaining lines are the commands that run your programs.
To submit a batch job, use the sbatch command. For example:
sbatch my.jobwhere the argument to the command is the job script's file name (e.g., my.job).
Submitted jobs are processed remotely. The process is recorded and written to an output file in the same directory where you submitted the job from. By default, this output file is named slurm-<jobid>.out. This is a plain-text file, so you can view it using the less command:
less slurm-<jobid>.out→ Monitoring your job
There are several commands you can use to monitor a job after it has been submitted.
The first thing you will want to check is if your job request was queued. Use the squeue command to view the status of your jobs:
squeue --meEach job is assigned a unique job identifier. It is sufficient to use only the numeric portion of the job ID when referencing a job or submitting a support ticket.
In the example below, the job 3271 has been placed in the default "main" partition (PARTITION):
ttrojan@discovery1:~$ squeue --me
  JOBID PARTITION     NAME     USER ST       TIME  NODES NODELIST(REASON)
   3271      main   my.job  ttrojan  R      35:58      1 d05-09
This job has been running for 35 minutes and 58 seconds (TIME). It has requested 4 CPUs and was allocated 1 node (NODES), which is d05-09 (NODELIST). The status of the job is "R" (running) (ST).
If you wish to cancel and remove your job from the queue, you can use the scancel command:
scancel <job_ID>Your job may remain in the queue for a short time, but its status will change to "CG" (completing) or "CA" (canceled).
Getting help
If you need additional assistance getting started with CARC and Discovery, please see the User Support page for more information.